Winter Vanilla Snowflake Cake
Winter Vanilla Snowflake Cake is a sweet and charming treat that feels like a cozy hug in dessert form. It’s a soft vanilla cake layered with creamy frosting and decorated…
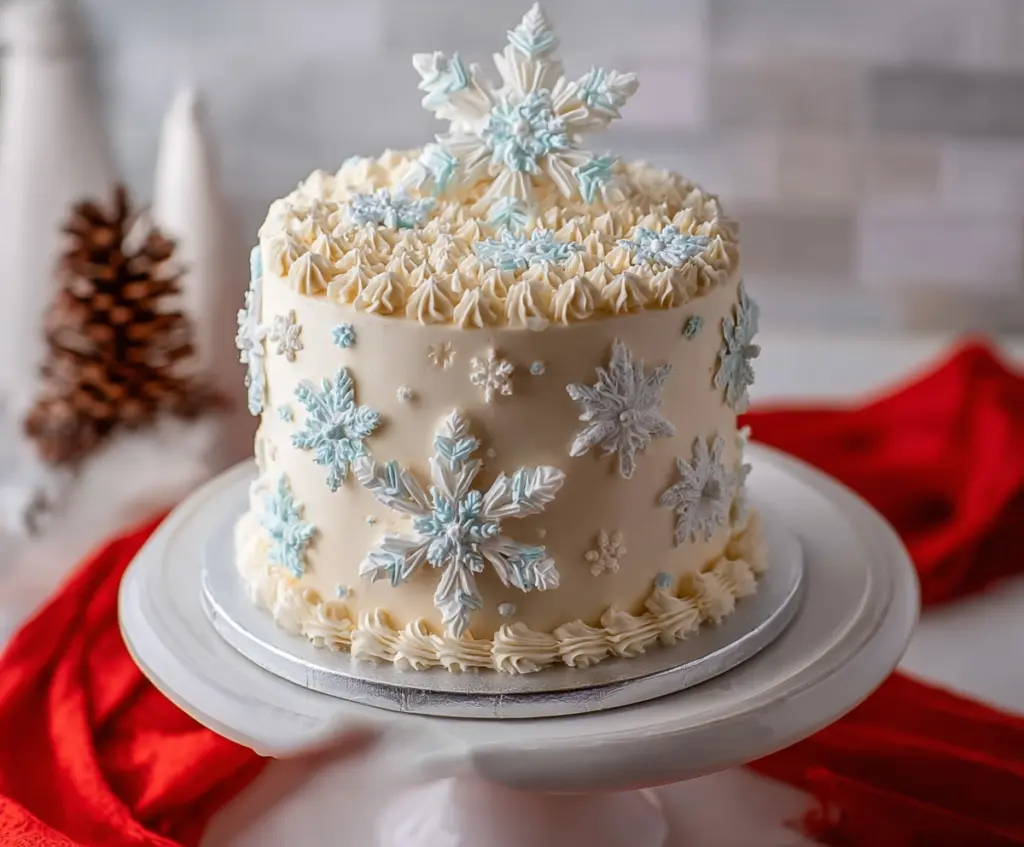
Tip: save now, cook later.Winter Vanilla Snowflake Cake is a sweet and charming treat that feels like a cozy hug in dessert form. It’s a soft vanilla cake layered with creamy frosting and decorated with delicate snowflake designs, making it perfect for celebrating the chilly season.
I love making this cake during the winter months because it’s both simple and special. The light vanilla flavor is gentle and comforting, while the snowflake decorations bring a little festive magic to the table. I find that this cake is always a hit, especially when shared with family or friends while sipping hot cocoa.
One of my favorite ways to serve it is with a sprinkle of powdered sugar on top to add a snowy touch, or even alongside some fresh berries to balance the sweetness. This cake makes every winter gathering feel a bit warmer and more joyful. I think you’ll enjoy baking and sharing it as much as I do!
Key Ingredients & Substitutions
Flour: All-purpose flour is the base here for a tender yet sturdy cake. You can swap half of it with cake flour if you want a lighter crumb. For gluten-free, use a 1:1 gluten-free baking flour blend.
Butter: Unsalted butter adds rich flavor and helps create a soft texture. If needed, you can use vegan butter, but consistency may vary slightly.
Milk: Whole milk gives the cake moisture and richness. For a dairy-free version, try almond or oat milk—just use plain and unsweetened.
Vanilla Extract: This is the heart of the flavor. Pure vanilla really shines here, but you can use vanilla bean paste for a stronger taste or imitation vanilla in a pinch.
Powdered Sugar: Essential for smooth, fluffy frosting. Sift it before mixing to avoid lumps. Confectioners’ sugar substitutes won’t work as well for the classic buttercream texture.
Food Coloring: Gel colors work best because they don’t thin out your frosting. Avoid liquid coloring as it can affect consistency.
How Do You Make Fluffy Vanilla Buttercream and Snowflake Decorations?
Buttercream needs to be whipped just right to get that smooth and airy texture perfect for spreading and piping:
- Start with soft (not melted) butter—room temperature is key.
- Add powdered sugar gradually while mixing at low speed to keep the mess down.
- Use heavy cream or milk to adjust consistency; add a little at a time.
- Beat on high speed at the end for 3-5 minutes to get fluffy frosting.
For snowflakes:
- Use piping bags with snowflake tips or silicone molds.
- Tint your frosting or royal icing lightly with gel colors—too much color can hide details.
- Pipe or fill molds and allow to fully dry before moving to avoid breaking.
- Attach snowflakes gently with a small dab of frosting.
Being patient during decorating makes a big difference—let your creations dry and set to keep the design crisp and beautiful.
Equipment You’ll Need
- Three 8-inch round cake pans – perfect for baking even layers and stacking your cake.
- Electric mixer – makes beating butter, sugar, and eggs easy for smooth batter and fluffy frosting.
- Mixing bowls – several sizes help you mix cake batter and frosting without mess.
- Offset spatula – great for spreading frosting evenly and smoothing cake sides.
- Piping bags and snowflake piping tips or silicone molds – essential for creating delicate snowflake decorations.
- Cooling racks – let cakes cool evenly and prevent sogginess.
Flavor Variations & Add-Ins
- Add almond extract with vanilla for a subtle nutty note that pairs well with the winter theme.
- Mix in finely chopped white chocolate or orange zest in the batter for extra brightness and texture.
- Swap out some vanilla buttercream for cream cheese frosting to add a tangy balance to the sweet cake.
- Include crushed peppermint candies on top or mixed into the frosting to add a festive minty twist.

Winter Vanilla Snowflake Cake
Ingredients You’ll Need:
For the Vanilla Cake:
- 2 ¾ cups (345g) all-purpose flour
- 1 tbsp baking powder
- ½ tsp salt
- 1 cup (230g) unsalted butter, softened
- 1 ¾ cups (350g) granulated sugar
- 4 large eggs, room temperature
- 1 tbsp pure vanilla extract
- 1 cup (240ml) whole milk, room temperature
For the Vanilla Buttercream Frosting:
- 1 ½ cups (340g) unsalted butter, softened
- 5 cups (600g) powdered sugar, sifted
- 2 tsp pure vanilla extract
- 2-4 tbsp heavy cream or milk
- Pinch of salt
For Decorating:
- White and light blue food coloring or gel
- Royal icing or additional buttercream for snowflake decorations
- Piping bags and snowflake piping tips or snowflake silicone molds
How Much Time Will You Need?
This cake takes about 20 minutes to prep, 25-30 minutes to bake, and around 1 hour for cooling and frosting. Decorating with snowflakes and chilling takes another 30 minutes or so. Overall, plan for about 2.5 hours from start to finish.
Step-by-Step Instructions:
1. Prepare the Cake Layers:
Preheat your oven to 350°F (175°C). Grease and flour three 8-inch round cake pans. In a medium bowl, whisk the flour, baking powder, and salt together. In a large bowl, beat softened butter and sugar until light and fluffy, about 3-5 minutes. Add eggs one at a time, mixing well after each. Stir in vanilla extract. Alternate adding dry ingredients and milk to the butter mixture, starting and ending with dry ingredients. Mix just until combined. Divide the batter evenly into the pans. Bake 25-30 minutes or until a toothpick inserted comes out clean. Cool in pans 10 minutes, then remove to wire racks to cool fully.
2. Make the Vanilla Buttercream Frosting:
Beat softened butter until creamy. Gradually beat in powdered sugar at low speed, then increase speed to combine. Mix in vanilla extract, salt, and 2 tablespoons heavy cream or milk. Beat on high for 3-5 minutes until fluffy. Add more cream or milk if needed to reach spreadable consistency.
3. Assemble and Frost the Cake:
Level your cooled cakes if needed. Place the first layer on a serving plate or board, spread an even layer of buttercream on top. Repeat with second and third layers. Apply a thin crumb coat over the entire cake and chill for 30 minutes. Finish with a smooth final coat of buttercream.
4. Prepare Snowflake Decorations:
Tint portions of buttercream or royal icing with white and light blue coloring. Use piping bags fitted with snowflake tips or silicone molds to create decorations. Allow molded decorations to dry fully before handling.
5. Decorate the Cake:
Pipe stars or rosettes on top of the cake with remaining vanilla buttercream. Attach snowflake decorations to the sides and top with small dabs of frosting. Place a large snowflake prominently on top as the centerpiece.
6. Final Touches:
Chill the cake briefly to set decorations. Serve at room temperature and enjoy your beautiful Winter Vanilla Snowflake Cake!
Can I Use Frozen Cake Layers for This Recipe?
Yes! You can bake the cake layers ahead of time and freeze them wrapped tightly in plastic wrap and foil for up to 2 months. Thaw them overnight in the fridge before frosting and decorating.
How Should I Store Leftover Cake?
Store leftover cake in an airtight container or cake dome at room temperature for up to 2 days, or refrigerate for up to 5 days. Let refrigerated cake come to room temperature before serving for best flavor.
Can I Substitute the Buttercream for a Different Frosting?
Absolutely! Cream cheese frosting or whipped cream can be great alternatives, but keep in mind the texture may be softer and decorations like snowflakes might need royal icing for stability.
What If I Don’t Have Snowflake Piping Tips or Molds?
No worries! You can use small star tips for similar effects or create simple snowflake shapes freehand with a toothpick or knife. Edible snowflake toppers or sprinkles can also add a festive touch.