Thick Cut Bacon Smash Burger
Thin, hard-seared smash patties bring the crunch, but the real payoff here is the contrast. You get lacy browned edges, melted cheese that runs into the crags, thick-cut bacon with…
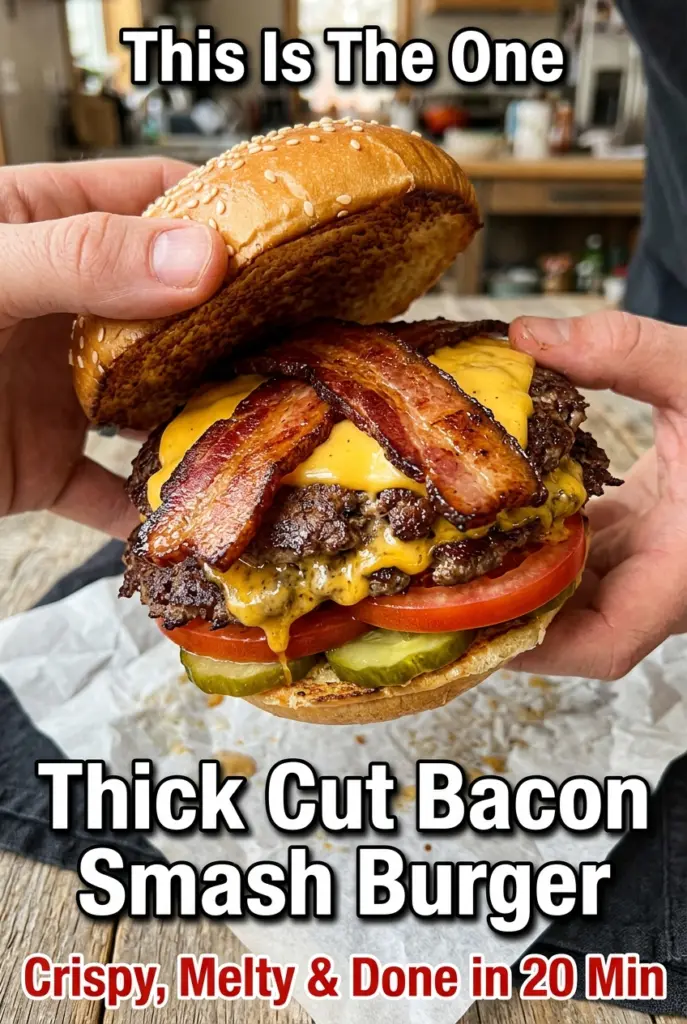
Tip: save now, cook later.Thin, hard-seared smash patties bring the crunch, but the real payoff here is the contrast. You get lacy browned edges, melted cheese that runs into the crags, thick-cut bacon with enough bite to stand up to the beef, and a brioche bun that goes soft and glossy from the steam and sauce. It eats like a diner burger with backyard attitude.
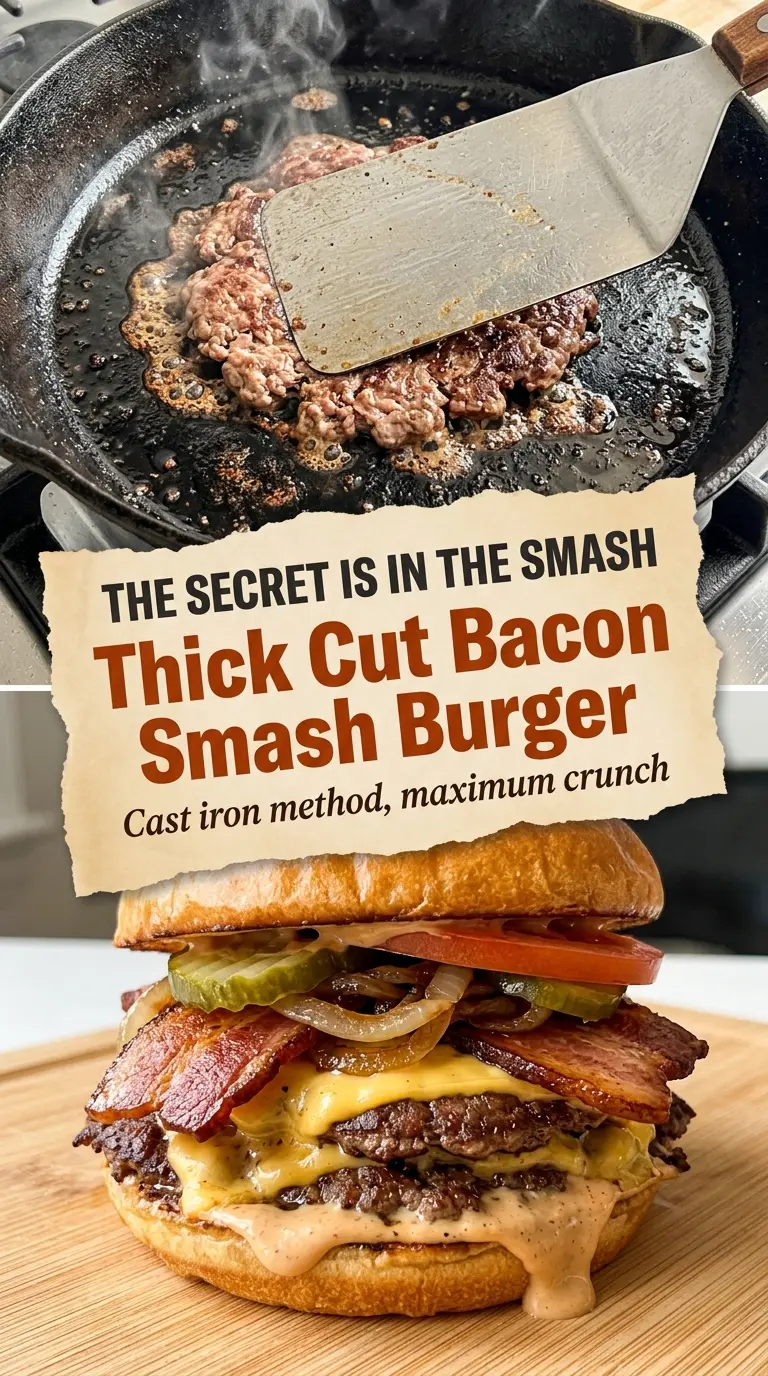
The trick is heat and restraint. The beef gets smashed once onto a smoking-hot cast iron surface, then left alone until the edges turn deep brown and crisp. That’s what gives you the shattered crust. The bacon cooks first so some of its fat can stay in the pan, which adds a smoky base for the onions and a little more flavor under the patties without making the burger greasy.
Below, I’ve broken down the one part that matters most, the ingredient choices that actually change the result, and the fast assembly order that keeps the patties hot and the bun from turning soggy before you sit down.
The patties got that crispy lace around the edges like the burger place downtown, and the bacon stayed thick enough to actually taste. I followed the timing exactly and the cheese melted right as the second batch finished.
Save this thick cut bacon smash burger for the nights when you want lacy-edged patties, smoky bacon, and a fast cast-iron dinner with zero grill needed.
The Smash That Makes the Crust
The biggest mistake with smash burgers is waiting too long to press the beef. Once the meat warms and starts to set, it stops spreading cleanly and you lose those frilly, crackly edges. The patty needs to hit a screaming-hot skillet as a loose ball and get smashed immediately, hard, and only once. After that, leave it alone until the underside turns deep brown and releases on its own.
Another thing that trips people up is overcrowding the pan. If the skillet cools down, the beef steams instead of searing and the burger ends up flat but not crisp. Work in batches, keep the pan hot enough to smoke lightly, and keep the patties thin. That thinness is the point. It gives you more crust per bite and keeps the stack from feeling heavy.
What Each Ingredient Is Doing in This Burger
The 80/20 beef matters here. Leaner beef won’t brown the same way and can taste dry once it’s smashed thin, while fattier beef gives you the crisp edges and juicy center this burger depends on. Divide it into loose balls before it hits the pan so you can move fast without handling it more than necessary.
- Thick-cut bacon — This isn’t a place for thin bacon. You want enough thickness that it stays meaty after frying and doesn’t disappear under the cheese and sauce. If your bacon is especially thick, lower the heat a little and give it a few extra minutes so the outside doesn’t burn before the fat renders.
- American cheese — It melts fast and smooth, which is exactly what you want on a smash burger. Cheddar works, but it won’t drape as evenly over the hot patty. If you use cheddar, shred it or slice it very thin so it has a chance to melt before the burger leaves the pan.
- Brioche buns — The soft richness plays nicely with the salty bacon and mustardy sauce. Toasting them in butter keeps them from getting soggy, especially with the burger sauce on both halves. If brioche is too sweet for you, use potato buns for a softer, less sugary finish.
- Smash burger sauce — Mayo, mustard, ketchup, relish, and vinegar make a sharp, creamy sauce that cuts through the fat. The white wine vinegar keeps it from tasting heavy. Mix it ahead so the flavors can settle while you cook.
- Caramelized onion — The onions need patience. Low heat turns them sweet and soft without burning, and that sweetness balances the salty bacon and sharp pickles. If you rush them over high heat, they’ll brown unevenly and taste harsh instead of mellow.
The Short Hot Window Where the Burger Comes Together
Mix the Sauce First
Stir the sauce ingredients together until smooth and tuck it into the fridge while you cook everything else. That resting time lets the vinegar and relish settle into the mayo instead of tasting separate and loose. If the sauce looks thin at first, leave it alone; it thickens a touch as it chills. This is the easiest part to get ahead on, and it keeps the final assembly moving.
Cook the Bacon, Then Use the Fat
Start the bacon in a cast iron skillet over medium heat and cook it until deeply golden with crisp edges and a little bend left in the middle. Pull it out, but leave a spoonful of fat in the pan. That fat carries flavor into the onions and gives the first sear on the burgers a little extra depth. If you leave too much fat behind, the patties will fry instead of sear.
Caramelize the Onions Without Burning Them
Add the butter and onions to the same pan over medium-low heat. Stir now and then, but don’t keep them moving constantly; they need contact with the pan to soften and take on color. After 12 to 15 minutes, they should be limp, golden at the edges, and sweet-smelling, not dark and bitter. If they start catching, lower the heat before they scorch.
Sear and Smash in One Motion
Turn the skillet up until it’s smoking lightly. Drop in one beef ball at a time and smash it immediately with a sturdy spatula or burger press for 10 to 15 seconds. That first press sets the shape and creates maximum surface contact, which is what builds the crust. Once the patty is down, don’t touch it until the edges are deeply browned and the center is no longer wet on top.
Flip Once and Melt the Cheese
Flip the patty in one clean motion. The crust should come off with a little resistance but not tear. Add the cheese right away, then give it 30 to 45 seconds until it melts and the edges of the patty keep sizzling. If the cheese isn’t softening, your heat dropped too much; keep the pan hot and work quickly.
How to Adapt This for Different Eaters and Different Kitchens
Dairy-Free Swap
Skip the butter and toast the buns in a little neutral oil. Use a dairy-free slice that melts well, or leave the cheese off and lean harder on the sauce, onions, and bacon for richness. You’ll lose a little of that classic creamy melt, but the burger still eats like a full, balanced stack.
Gluten-Free Version
Use gluten-free buns that are sturdy enough to hold the sauce and juices, or serve the patties in lettuce wraps if you want a lighter finish. The beef, bacon, and toppings don’t need any changes. Toasting the gluten-free buns first helps keep them from crumbling once the sauce goes on.
No Bacon, Still Big on Flavor
If you’re skipping bacon, add a pinch more salt to the patties and keep the caramelized onions in the stack. The burger loses the smoky chew, so the sauce and cheese need to carry more weight. A splash of Worcestershire in the beef is a good backup if you want a deeper savory note.
Storage and Reheating
- Refrigerator: Store the cooked patties, bacon, and onions separately for up to 3 days. The crust softens a bit, but the flavor stays solid.
- Freezer: The cooked patties freeze well for up to 2 months if wrapped tightly and layered with parchment. Freeze the bacon separately; the buns and fresh toppings don’t freeze well.
- Reheating: Reheat the patties in a hot skillet for a couple of minutes per side, not in the microwave. The microwave makes the crust rubbery and the bacon limp. Warm the onions in the same pan and toast fresh buns for the best texture.
Answers to the Questions Worth Asking

Thick Cut Bacon Smash Burger
Ingredients
Equipment
Method
- Mix mayonnaise, yellow mustard, ketchup, white wine vinegar, sweet pickle relish, smoked paprika, and onion powder in a small bowl until smooth. Cover and refrigerate.
- Cook thick-cut bacon in a cast iron skillet over medium heat for 4–5 minutes per side until deeply golden and crispy at the edges but still slightly chewy in the center. Remove to a paper towel-lined plate and set aside.
- Leave 1 tbsp bacon fat in the pan, then add unsalted butter and onion slices to the same skillet over medium-low heat. Cook 12–15 minutes, stirring occasionally, until softened and lightly caramelized, then remove and set aside.
- Increase cast iron to high heat until it begins to smoke lightly, then toast brioche burger buns cut-side down in a separate pan with butter for 1–2 minutes until golden. Set aside.
- Season 80/20 ground beef balls with kosher salt, black pepper, and garlic powder. Working in batches, place one ball on the hot cast iron and immediately press down hard with a flat spatula or burger press for 10–15 seconds to smash into a thin wide patty.
- Cook the patty undisturbed for 2–2.5 minutes until the edges are lacy, crispy, and deep brown, then season the top with a pinch of salt. Flip once.
- Immediately lay American cheese on top and cook for 30–45 seconds until melted with edges sizzling and caramelized. Keep patties hot for assembly.
- Spread burger sauce on both bun halves, add iceberg lettuce leaves and ripe tomato to the bottom bun, and stack two smashed patties. Top with caramelized onions, cross two strips of thick-cut bacon, add sliced dill pickles, and finish with the sauced top bun.
- Serve immediately while the cheese is still molten and the patties are hot and crispy.