Red Velvet Cheesecake Bars
Red Velvet Cheesecake Bars are a delightful treat that combines the rich, velvety texture of classic red velvet cake with the smooth creaminess of cheesecake. With their vibrant red color…
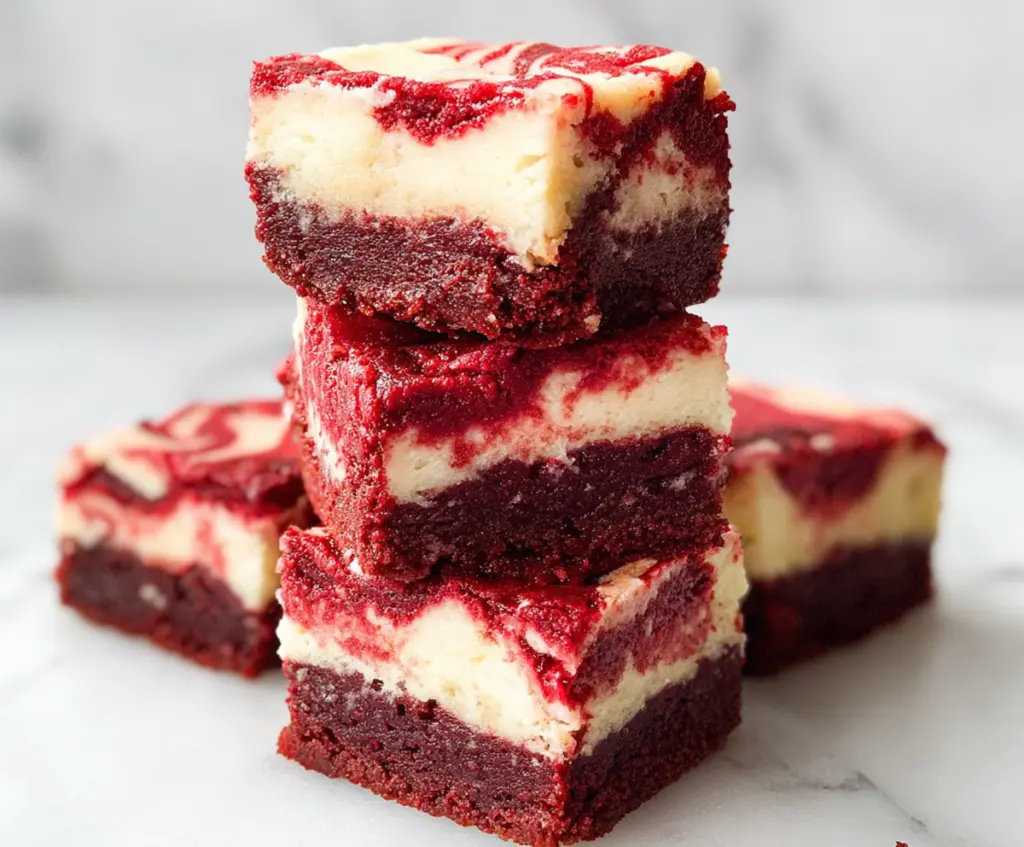
Tip: save now, cook later.Red Velvet Cheesecake Bars are a delightful treat that combines the rich, velvety texture of classic red velvet cake with the smooth creaminess of cheesecake. With their vibrant red color and a luscious, creamy layer on top of a soft cake base, these bars are as pleasing to the eye as they are to the taste buds. A perfect mix of sweet and slightly tangy, they bring together two favorite desserts in one easy-to-handle bar.
I love making these bars whenever I want a sweet dessert that’s a little more special but still simple to whip up. The cream cheese layer adds a nice balance to the red velvet’s cocoa flavor, making each bite feel luxurious without being too heavy. I find that letting them chill well after baking helps the flavors settle and the bars hold their shape neatly when cut, which always impresses guests.
These bars are perfect for sharing at gatherings or just enjoying as a little afternoon pick-me-up with a cup of coffee. I like to serve them cold, straight from the fridge, because their creamy texture is so refreshing. They also travel well, so they’re my go-to dessert for potlucks or picnics. Whenever I bring these along, people ask for the recipe right away!
Key Ingredients & Substitutions
Cream Cheese: This is the star of your cheesecake layer. Make sure it’s softened for a smooth mix. If you want a lighter option, try using part-skim cream cheese. Avoid whipped versions as they can affect texture.
Buttermilk: It adds tang and moisture to the red velvet layer. If you don’t have buttermilk, mix 1/2 cup milk with 1/2 tsp vinegar or lemon juice and let it sit for 5 mins before using.
Red Food Coloring: This gives red velvet its vibrant color. Gel food coloring is best because it won’t thin your batter. If you prefer natural options, beet juice works but may alter the taste slightly.
Vegetable Oil: Keeps the red velvet moist and tender. You can swap it with melted coconut oil or canola oil if needed, but avoid strong-flavored oils.
How Do You Get the Perfect Swirl Without Overmixing?
Creating the pretty marbled swirl is fun but tricky. You want to mix just enough so the layers borrow color, without blending them into one.
- Drop spoonfuls of the red velvet batter on top of the cheesecake layer evenly.
- Use a thin knife, skewer, or toothpick to gently drag through the batters. Swirl in a figure-eight or random pattern.
- Stop once you see pretty ribbons of red and cream color. Avoid heavy stirring to keep distinct layers.
This technique helps the bars look attractive and ensures the cheesecake holds its creamy texture rather than mixing into the cake.
Equipment You’ll Need
- 9×9 inch baking pan – perfect size for thick bars that bake evenly.
- Parchment paper – makes it easy to lift the bars out without sticking.
- Mixing bowls – one for red velvet batter, one for cheesecake mix keeps flavors separate.
- Electric mixer or hand whisk – helps whip cream cheese until smooth and mixes batter well.
- Knife or skewer – essential for swirling the layers to get that pretty marble effect.
Flavor Variations & Add-Ins
- Add chocolate chips to the red velvet batter for extra pockets of melty goodness.
- Swap cream cheese with mascarpone for a richer, silkier cheesecake layer.
- Stir in a teaspoon of espresso powder to the red velvet for a subtle mocha twist.
- Top bars with crushed pecans or walnuts before baking for pleasant crunch.

How to Make Red Velvet Cheesecake Bars
Ingredients You’ll Need:
For the Red Velvet Layer:
- 1 ½ cups all-purpose flour
- 1 cup granulated sugar
- ¼ cup unsweetened cocoa powder
- ½ tsp baking soda
- ¼ tsp salt
- ½ cup vegetable oil
- ½ cup buttermilk
- 1 large egg
- 1 tbsp red food coloring
- 1 tsp vanilla extract
- 1 tsp white vinegar
For the Cheesecake Layer:
- 16 oz (450g) cream cheese, softened
- ⅔ cup granulated sugar
- 1 large egg
- 1 tsp vanilla extract
Time Needed:
This recipe takes about 15 minutes to prepare, 35-40 minutes to bake, and then at least 3 hours of chilling time in the refrigerator to set before serving.
Step-by-Step Instructions:
1. Get Your Pan and Oven Ready:
Preheat your oven to 350°F (175°C). Grease a 9×9 inch baking pan or line it with parchment paper, leaving an overhang on the sides so you can lift the bars out easily when they’re done.
2. Make the Red Velvet Batter:
In a big bowl, sift together the flour, sugar, cocoa powder, baking soda, and salt. Then add the vegetable oil, buttermilk, egg, red food coloring, vanilla extract, and vinegar. Mix everything until the batter is smooth and all the ingredients are combined well.
3. Prepare the Cheesecake Filling:
In a separate bowl, beat the softened cream cheese with the sugar until it’s creamy and smooth. Add the egg and vanilla extract, and mix just until everything is combined—don’t overmix.
4. Assemble the Layers:
Spread half of the red velvet batter evenly into the bottom of your prepared pan. Carefully spread the cheesecake mixture over the red velvet layer. Then add spoonfuls of the remaining red velvet batter on top.
5. Create the Swirl:
Use a knife or skewer to gently swirl the top layers together, creating a pretty marbled effect. Be careful not to overmix—just enough to see the red and cream colors beautifully blended in a swirl.
6. Bake Your Bars:
Bake in the preheated oven for 35 to 40 minutes. You’ll know it’s done when the cheesecake layer is set and a toothpick inserted into the red velvet part comes out with just a few moist crumbs (not wet batter).
7. Cool and Chill:
Let the bars cool completely at room temperature. Then chill them in the fridge for at least 3 hours or overnight to let them set firmly for easier cutting.
8. Cut and Serve:
Use the parchment paper overhang to lift the bars out of the pan. Cut them into squares, serve chilled, and enjoy the creamy and colorful treat!
Can I Use Frozen Cream Cheese for the Cheesecake Layer?
It’s best to use cream cheese that’s fully thawed and softened to room temperature. This helps it blend smoothly with the sugar and eggs, preventing lumps in your cheesecake layer.
Can I Make Red Velvet Cheesecake Bars Ahead of Time?
Absolutely! Prepare and bake the bars, then chill them overnight. They actually taste better the next day as the flavors meld and the bars firm up for cleaner slices.
How Should I Store Leftovers?
Keep leftover bars in an airtight container in the fridge for up to 4 days. You can also freeze them for up to 2 months—just thaw overnight in the fridge before serving.
What’s the Best Way to Cut These Bars Without Crumbling?
Use a sharp knife and wipe it clean between each cut. For cleaner slices, chill the bars well before cutting, and warming the knife slightly with hot water can help make smooth cuts.