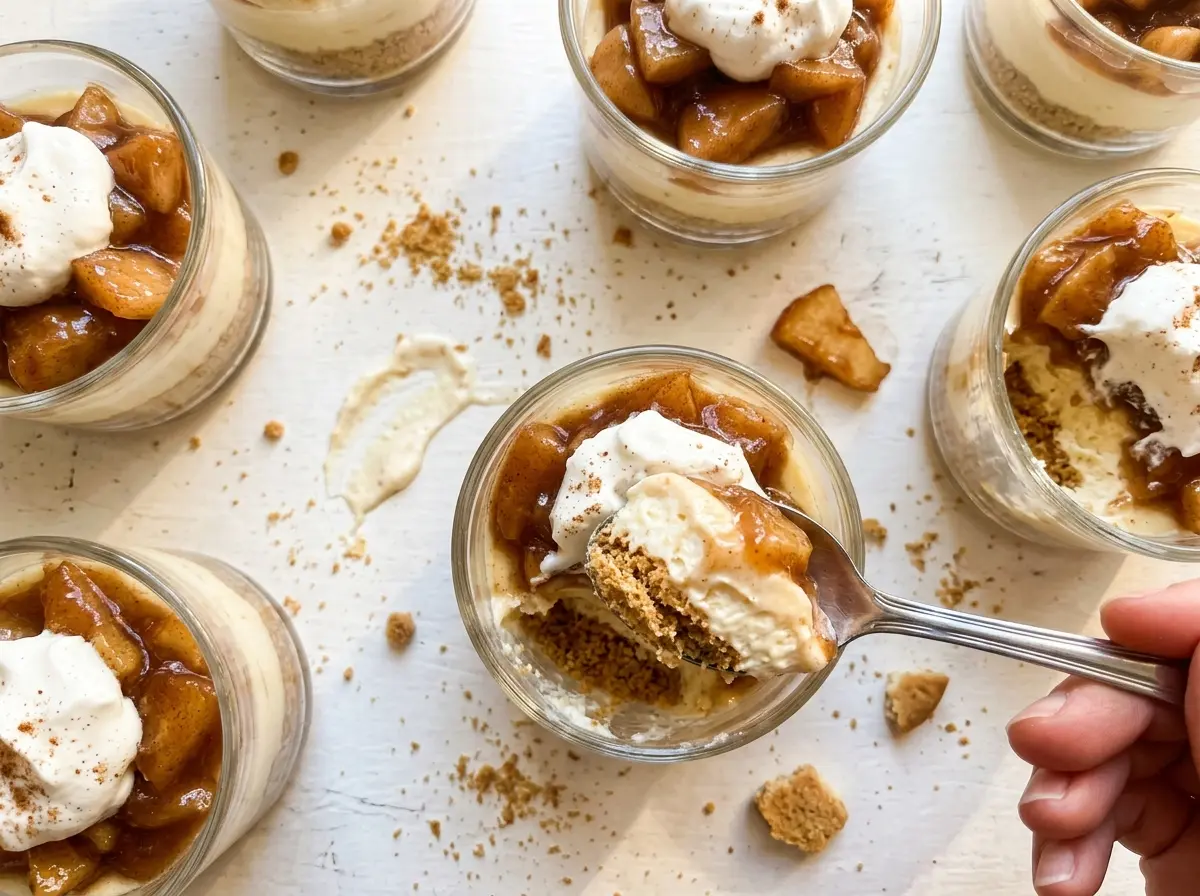
Brown sugar and cinnamon bubble around the apple pieces, and the kitchen starts to smell like apple pie before the topping has even thickened. I cook the apples just until tender, while they still hold their shape; soft chunks give each spoonful a little bite instead of disappearing into the sauce. That’s what makes these Apple Pie Cheesecake Dessert Cups feel like apple pie tucked into a creamy cheesecake layer.
The filling is lighter than a baked cheesecake because whipped heavy cream is folded into softened cream cheese. Underneath, a buttery graham cracker layer gives the cups a little crunch, and the cinnamon apples bring a soft, glossy finish. Chill the assembled cups before serving, and you get distinct layers that are easy to scoop straight from the glass.
Kitchen Note
Don’t spoon warm apples onto the cheesecake filling. I wait until the topping is completely cool; even a little warmth can soften the airy filling and blur the clean layers.
Save these Apple Pie Cheesecake Dessert Cups for a make-ahead treat with buttery graham layers and cinnamon apples.
Why the Graham Layer Works Better as a Spoonable Base Than a Sliceable Crust
A crumb crust in a full-size cheesecake has to hold together when you cut and lift a wedge. These cups don’t have that job. The glass holds each portion in place, so the graham layer can be pressed into a firm, buttery base without needing to become a rigid shell.
That changes what you’re aiming for: crumbs should be evenly moistened and packed into a level layer, but they don’t need to come up the sides of the cup. When you scoop through the finished dessert, the crust gives a little resistance before the soft filling and apples. Press it firmly enough to keep the crumbs from scattering, but don’t expect a crisp, baked-cookie texture; this is a chilled, no-bake layer.
The individual cups also keep the apple topping where it belongs. Each serving gets its own generous layer, rather than a topping that slides off a cut slice. Using the specified 10-ounce cups leaves room for the crust, filling, and fruit without crowding the top.
Why the Filling Needs Both Cream Cheese and Cold Heavy Cream

- Cream cheese — It gives the filling its tang and body. Let it soften before mixing so it beats smoothly; a standard block-style package gives a sturdier result than whipped cream cheese from a tub.
- Cold heavy cream — This is what makes the filling airy. It needs to be cold enough to whip to stiff peaks, so keep it refrigerated until you’re ready to beat it.
- Powdered sugar and vanilla — Powdered sugar blends smoothly into the cream cheese, while vanilla rounds out its tang. A basic store-brand powdered sugar works well here.
- Apples — Choose firm apples that keep their shape as they cook. Granny Smith brings a sharper tartness; a sweeter, crisp apple makes the topping gentler. Cut the pieces evenly so they soften at about the same pace.
- Brown sugar, cinnamon, lemon juice, and cornstarch — Brown sugar and cinnamon make the topping taste pie-like, lemon juice keeps the sweetness from feeling heavy, and cornstarch thickens the cooking juices. Stir the cornstarch with water until smooth before it goes into the pan.
- Graham cracker crumbs, butter, and granulated sugar — The crumbs provide the toasty base, while melted butter binds them and sugar adds a light sweetness. Store-brand crumbs are fine; an even, fine crumb is easier to press into a compact layer.
Build Each Layer Without Losing Its Texture
Cook the Apples Until Tender, Not Falling Apart
Combine the peeled, cored, 1/2-inch apple pieces with brown sugar, cinnamon, lemon juice, and part of the water in a 2-quart saucepan. Cook over medium heat for 6–8 minutes, stirring occasionally, until the apples are tender but still hold their shape. Mix the cornstarch with the remaining water until smooth, then stir it into the apples. Cook for 1 minute, until the juices look glossy and thickened, then transfer the topping to a bowl and refrigerate until completely cool, about 30 minutes.
Press a Level Graham Cracker Base
Stir the graham cracker crumbs, melted butter, and granulated sugar together until the crumbs are evenly coated. Divide the mixture among six 10-ounce dessert cups. Press it firmly into an even layer at the bottom of each cup; loose, uneven crumbs are more likely to scatter when you scoop into the dessert.
Whip the Cream Before Folding
Beat the softened cream cheese with the powdered sugar and vanilla in a medium bowl for 1–2 minutes, until smooth. In a separate bowl, beat the cold heavy cream with an electric mixer for 2–3 minutes, until stiff peaks form. Fold the whipped cream gently into the cream cheese mixture. Stop once the mixture looks even so you keep the light texture rather than beating the air back out.
Layer and Chill the Cups
Divide the cheesecake filling among the cups and spread it over the crusts. Spoon the cooled apple topping evenly over the filling, keeping the fruit and its thickened juices together. Cover the cups and refrigerate for at least 2 hours before serving so the layers have time to chill and settle.
Three Small Changes That Give These Cups a Different Twist
Use gluten-free graham-style crumbs
Swap in gluten-free graham cracker crumbs for the regular crumbs, keeping the rest of the crust ingredients and method the same. The base will still be buttery and spoonable, though the exact crumb texture depends on the brand.
Choose Granny Smith apples for a tarter topping
Granny Smith apples bring a sharper contrast to the sweet filling and brown sugar. Keep the pieces the same size and use the tenderness of the fruit as your cue while it cooks; this choice gives the topping a brighter, less candy-sweet edge.
Give the crust a deeper brown-sugar note
Replace the granulated sugar in the crust with the same amount of packed light brown sugar. It brings a warmer molasses note and makes the crumb layer a little softer and more cohesive.
Chilled Storage and Serving
- Refrigerator: Cover the cups and refrigerate for up to 3 days. The graham layer gradually softens beneath the filling.
- Freezer: Freezing isn’t recommended; the whipped filling can lose its airy texture and the apples become softer after thawing.
- Serving: Serve cold, straight from the refrigerator. These cups aren’t meant to be reheated.
Questions That Come Up When Making These Cheesecake Cups
Apple Pie Cheesecake Dessert Cups
Ingredients
Equipment
Method
- Combine the apples, brown sugar, cinnamon, lemon juice, and 2 tablespoons of the water in a 2-quart saucepan.
- Cook over medium heat, stirring occasionally, for 6–8 minutes, until the apples are tender but still hold their shape.
- Stir the cornstarch with the remaining 1 tablespoon water until smooth.
- Stir the cornstarch mixture into the apples and cook for 1 minute, until the liquid is glossy and thickened.
- Transfer the apple topping to a bowl and refrigerate until completely cool, about 30 minutes.
- Stir the graham cracker crumbs, melted butter, and granulated sugar together in a bowl.
- Divide the mixture among six 10-ounce dessert cups.
- Press the mixture firmly into an even layer.
- Beat the cream cheese, powdered sugar, and vanilla in a medium bowl with an electric mixer until smooth, 1–2 minutes.
- In a separate bowl, beat the cold heavy cream with an electric mixer until stiff peaks form, 2–3 minutes.
- Gently fold the whipped cream into the cream cheese mixture.
- Divide the cheesecake filling among the cups and spread it over the crusts.
- Spoon the cooled apple topping evenly over the filling.
- Cover and refrigerate for at least 2 hours before serving.