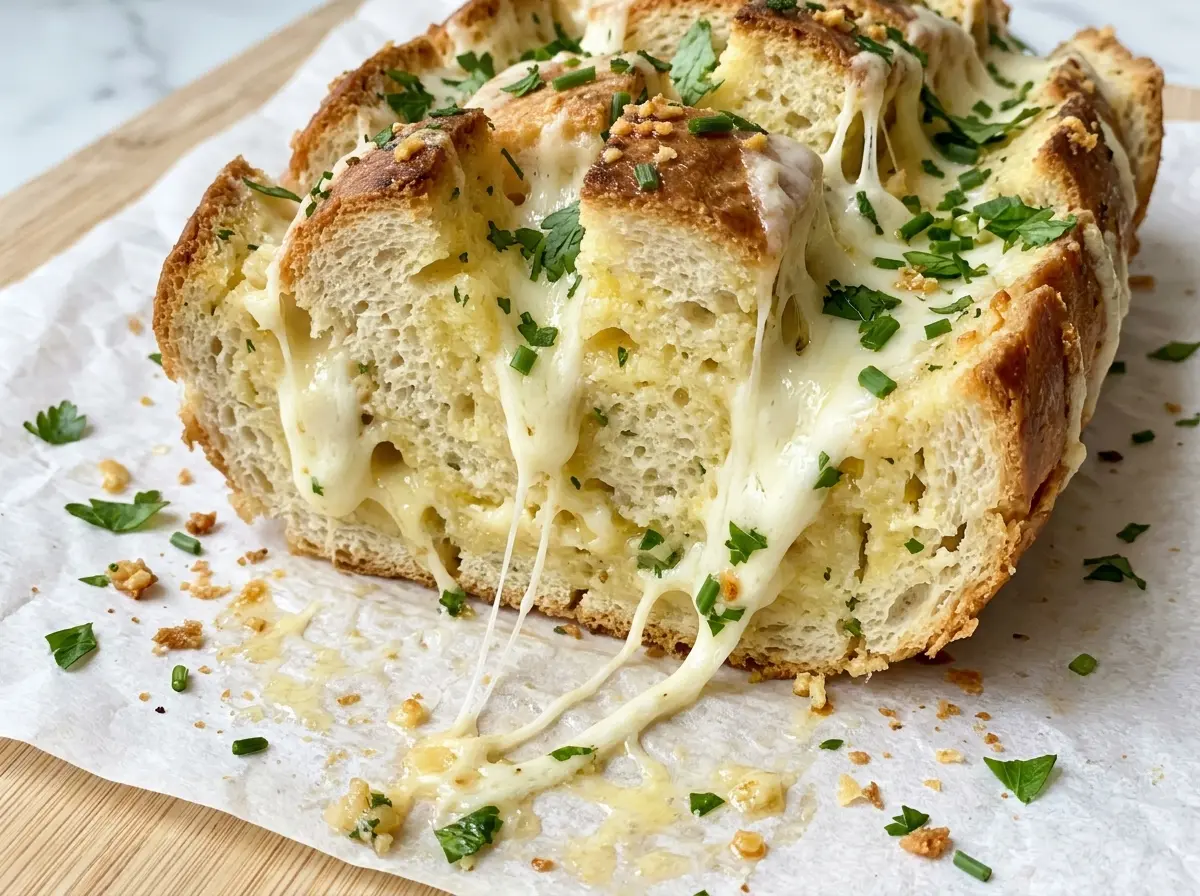
The first time I cut into a stuffed loaf, I went straight through the bottom and watched the butter run onto the baking sheet. With this cheesy garlic pull apart bread, stopping the cuts just above the bottom crust keeps the boule in one piece while still giving the butter and cheese plenty of room to reach the middle. You get crisp edges around the cuts and soft, cheesy pieces that pull away without the loaf falling apart.
I stir the herbs and garlic into melted butter first, then spoon it into the crosshatch so the flavor doesn’t stay only on the surface. Low-moisture mozzarella melts into long, stretchy pockets, while sharp cheddar adds a more pronounced cheese flavor. The brief rest after baking gives the melted cheese a moment to settle, so the bread is easier to pull apart while it’s still warm.
Kitchen Note
Give the loaf its full 5-minute rest before serving. The cheese stays melted, but it settles enough that the bread pulls apart in pieces instead of coming away in one long, slippery stretch.
Save this cheesy garlic pull apart bread with herbs for a warm, buttery loaf packed with mozzarella and sharp cheddar.
Why the Crosshatch Should Stop Short of the Bottom Crust
A pull-apart loaf needs to be cut deeply enough for the butter and cheese to get between its sections, but not so deeply that the pieces detach before baking. Leaving the bottom crust intact gives the boule a base that holds its shape as you fill the cuts and move it onto the baking sheet. That matters even more once the cheese softens and the butter coats the inside.
Make the cuts in a crosshatch, with the sections about 1 inch wide, and keep the knife above the bottom crust as you work. The grid creates lots of little pockets instead of a few broad openings. That gives you more places to tuck in the shredded cheese and more seasoned bread at the edges to crisp in the oven. If a few cuts stop short near the center, that’s better than slicing through the base; the loaf will still bake together, and the top remains easy to pull apart.
The round boule also makes the portions feel natural: each section can be pulled away from the center or edge. You don’t need to cut it into wedges before baking. The intact bottom supports the loaf while it cooks, then the crosshatch does the work of separating the servings at the table.
How the Bread, Herbs, and Two Cheeses Shape Every Bite

- Sourdough boule — A round, sturdy loaf gives the crosshatch enough structure to hold the filling. A loaf with a firm crust is easier to score cleanly than a very soft sandwich-style bread. Keep it whole until you cut the grid; pre-sliced bread won’t hold the same pockets of butter and cheese.
- Low-moisture mozzarella — This is the stretchy part of the filling, and the low-moisture style melts without adding as much water to the bread. Shred it yourself from a block if you want the cheese to melt in a more cohesive way; packaged shredded cheese is convenient, though its coating can make the melt a little less smooth. Fresh mozzarella isn’t a direct swap here because its extra moisture can leave the bread wetter.
- Sharp cheddar — Cheddar brings a stronger, tangier taste alongside the mild mozzarella. A sharp variety gives the loaf a more distinct cheese flavor than mild cheddar would. Shred it before filling the cuts so it can be distributed throughout the loaf rather than sitting in a few large pieces.
- Fresh parsley and chives — These herbs bring a fresh, green note to the butter. Chop them finely so they spread through the mixture and don’t collect in a few cuts. Fresh herbs have a brighter character here than dried versions, so dried parsley or chives won’t give the same result.
- Garlic and dried oregano — Minced garlic flavors the melted butter directly, while dried oregano gives the mixture a savory, earthy note. Mince the garlic finely so you don’t end up with a large raw-tasting piece in one bite. Dried oregano is useful here because it disperses easily through the butter.
From Herb Butter to Crisp, Cheese-Filled Edges
Stir the Garlic Herb Butter
Combine the melted butter, minced garlic, chopped parsley, chopped chives, dried oregano, and kosher salt in a small bowl. Stir until the herbs and garlic are spread throughout, not sitting in a pile at the bottom. This mixture should be fluid enough to spoon into the bread’s cuts. If the butter begins to firm up before you use it, stir it again so the herbs are evenly distributed.
Score the Boule Without Cutting Through
Heat the oven to 375°F and set a sheet of aluminum foil on a rimmed baking sheet. Cut the sourdough boule in a crosshatch pattern, making sections about 1 inch wide. Stop each cut before it reaches the bottom crust, and keep the knife steady as you work across the loaf. The boule should remain in one piece when you lift it.
Fill the Cuts and Bake in Two Stages
Set the bread on the foil, then spoon the garlic herb butter into the cuts and over the top. Tuck the shredded mozzarella and cheddar into the openings, spreading the cheese around the loaf rather than filling only the outer cuts. Wrap the bread loosely in the foil and bake for 15 minutes. Open the foil and bake for another 10 to 15 minutes, until the cheese has melted and the edges of the bread are crisp.
Rest Before Pulling Apart
Take the bread out of the oven and let it rest for 5 minutes before serving. The cheese should be melted into the cuts, with some browned, crisp edges around the top. If the center still looks a little softer than the outside, that’s expected in a loaf filled with melted cheese and butter. Pull off individual sections while the bread is warm.
Small Adjustments That Keep This Loaf’s Character
A Gluten-Free Boule
For a gluten-free version, use a round gluten-free loaf in place of the sourdough boule, keeping the loaf close to the same size so the filling has a similar amount of bread to nestle into. Gluten-free loaves can be more delicate, so cut with a light hand and leave the base intact. The texture will be less chewy than sourdough, but the garlic herb butter and cheeses still make flavorful pockets.
Choose a More Tangy or Mild Boule
Sourdough loaves vary in how pronounced their tang is. A milder boule lets the garlic, herbs, and cheeses come forward; a more tangy loaf gives each bite a sharper contrast. Keep the round shape and 16-ounce size so the cuts and filling proportions remain suited to the loaf.
Storage and Reheating
- Refrigerator: Refrigerate leftovers within 2 hours and use them within 3 to 4 days. The bread will soften in the refrigerator as the butter and cheese cool.
- Freezer: Freeze cooled leftovers wrapped tightly, then place them in an airtight freezer bag or container. Use within 2 months for the best texture; the bread may be softer after thawing.
- Reheating: Reheat in the oven, covered loosely with foil, until the center is warm and the cheese has softened. Remove the foil near the end if you want to crisp the edges again; reheating uncovered from the start can dry the bread before the middle warms.
Questions That Come Up While Making Cheesy Garlic Pull Apart Bread
Cheesy Garlic Pull Apart Bread with Herbs
Ingredients
Equipment
Method
- Stir the melted butter, garlic, parsley, chives, oregano, and salt together in a small bowl.
- Heat the oven to 375°F.
- Set a sheet of aluminum foil on a rimmed baking sheet.
- Cut the boule in a crosshatch pattern into 1-inch sections, stopping before you cut through the bottom crust.
- Set the bread on the foil and spoon the garlic herb butter into the cuts and over the top.
- Tuck the mozzarella and cheddar into the cuts, distributing them evenly.
- Wrap the bread loosely in the foil and bake for 15 minutes.
- Open the foil and bake for 10 to 15 minutes more, until the cheese is melted and the bread is crisp at the edges.
- Let the bread rest for 5 minutes before serving.