The bacon should still bend when it comes out of the skillet; if it’s already crisp, wrapping the beans becomes a fussy job. I cook it just long enough to release some fat, then let the oven finish the work. That small timing detail makes these green bean bundles wrapped in bacon much easier to assemble and gives the bacon room to crisp around each bundle.
The beans get a short boil before they meet the bacon, which gives them a head start without leaving them limp after baking. Patting them dry matters, too: wet beans can steam under the glaze instead of roasting. Once each bundle is wrapped and brushed with buttery brown sugar glaze, the pan goes into a hot oven until the bacon is crisp and the beans are tender. The edges turn glossy and savory-sweet, with a little pepper to keep the glaze from tasting flat.
Kitchen Note
Stop cooking the bacon while it’s still pliable enough to bend around the beans. If it gets crisp in the skillet, it can crack as you wrap it and may become too dark in the oven.
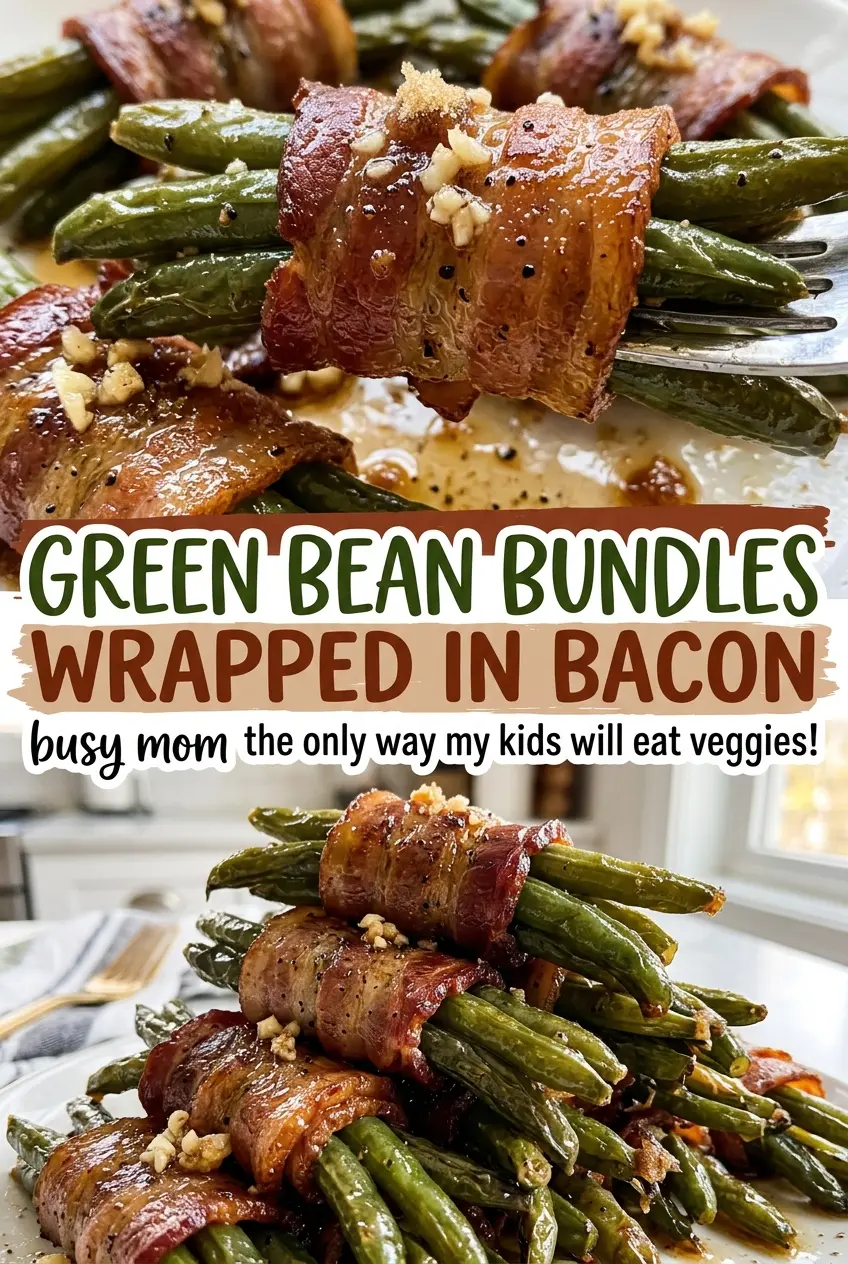
Save these bacon-wrapped green bean bundles for a side dish with crisp bacon, tender beans, and a buttery brown sugar glaze.
Why These Green Beans Need a Blanch Before the Bacon Wrap
Green beans and bacon don’t finish cooking at the same pace. If raw beans go straight into the oven, they need more time to turn tender, and the bacon can overcook before they’re ready. A quick blanch gets the beans partway there, so the oven can focus on crisping the bacon and bringing everything together.
Drying the beans after blanching is just as useful as the boiling itself. Water clinging to the beans creates steam on the sheet pan and can thin the glaze, leaving it less likely to cling. Spread the beans out on paper towels and pat them dry before bundling. That way, the buttery sugar glaze meets the beans and bacon directly instead of pooling in extra moisture.
Fresh Beans, Regular-Cut Bacon, and a Glaze That Clings

- Fresh green beans — Choose firm beans that snap cleanly rather than bend or look limp. Trim the ends before blanching so the bundles are easy to portion and eat. Frozen beans release extra moisture as they bake, so fresh beans give the most dependable texture here.
- Regular-cut bacon — Regular-cut slices render and crisp within the same window the beans need in the oven. Thick-cut bacon is slower to crisp and can leave you choosing between softer bacon and more-cooked beans. There isn’t a direct bacon swap that behaves exactly the same way in this timing.
- Light brown sugar — It melts into the butter for a sweet glaze with a soft molasses note. Dark brown sugar works in its place, though the glaze will taste deeper and more molasses-forward. A bargain bag is fine; just break up any hard lumps before stirring it in.
- Unsalted butter — Butter gives the glaze its round, rich base and lets the brown sugar coat the bundles. Salted butter can stand in, but the glaze will have a saltier edge; the unsalted version keeps that flavor easier to control.
- Garlic powder and black pepper — These dry seasonings mix evenly into the glaze without adding moisture. Granulated garlic can replace garlic powder, though its texture is a little coarser. Fresh garlic isn’t the best fit for this quick glaze because small pieces can brown too much during baking.
- Kosher salt — Salt in the blanching water seasons the beans before they’re wrapped. It’s worth using the full amount in the water rather than trying to season the finished bundles from the outside.
How to Get Crisp Bacon Without Overcooking the Beans
Blanch and Dry the Beans
Bring the water and kosher salt to a boil in a large pot, then add the trimmed beans and blanch for 3 minutes. Drain them promptly and spread them over paper towels. Pat the beans dry on all sides; damp beans can soften the bacon and dilute the glaze as the bundles bake.
Render the Bacon Until It Still Bends
Cook the bacon in a 12-inch skillet over medium heat for 4 to 6 minutes, turning it once. Look for some fat to render while the slices remain flexible, not crisp. Drain them on paper towels before wrapping so excess grease doesn’t collect beneath the bundles on the pan.
Wrap Each Bundle Seam-Side Down
Divide the beans into 12 equal bundles and wrap each one with half a slice of bacon. Set every bundle seam-side down on an 18×13-inch rimmed baking sheet lined with foil. The seam stays tucked underneath as the bacon firms in the oven, so the wrap is less likely to loosen while baking.
Spoon on the Glaze and Bake
Melt the butter in a small saucepan over low heat, then stir in the brown sugar, garlic powder, and black pepper until combined. Spoon the glaze evenly over the bundles and bake at 400°F for 20 to 25 minutes, until the bacon is crisp and the beans are tender. Let the bundles rest for 5 minutes before serving; the glaze will settle onto the beans instead of running off as soon as they leave the pan.
Small Changes That Keep the Sweet-Savory Balance
Give the Glaze a Little Heat
Stir a pinch of cayenne into the butter and brown sugar with the garlic powder and black pepper. The added heat cuts through the sweetness without changing the glaze’s buttery texture, so the bundles still bake the same way.
Add a Bright Note with Lemon
Stir finely grated lemon zest into the finished glaze just before spooning it over the bundles. The citrus lifts the buttery sweetness and gives the dish a fresher finish, without adding the liquid that lemon juice would.
Make the Glaze Dairy-Free
Replace the butter with an equal amount of stick-style dairy-free butter. It melts into the brown sugar and seasonings, though the finished glaze will have a slightly less buttery taste than the original.
Storage and Reheating
- Refrigerator: Refrigerate leftovers within 2 hours and keep them in an airtight container for 3 to 4 days. The beans soften and the bacon loses some crispness as it sits.
- Freezer: Freezing isn’t recommended. Thawed beans turn soft, and the bacon won’t regain its crisp texture.
- Reheating: Warm the bundles on a foil-lined baking sheet at 350°F until the centers reach 165°F. Avoid microwaving if you want to keep the bacon from turning softer.
Questions That Come Up Before These Bundles Go in the Oven
Green Bean Bundles Wrapped in Bacon
Ingredients
Equipment
Method
- Preheat the oven to 400°F and line an 18x13-inch rimmed baking sheet with foil.
- Bring the water and kosher salt to a boil in a large pot.
- Add the green beans and blanch for 3 minutes.
- Drain the beans, spread them on paper towels, and pat dry.
- Cook the bacon in a 12-inch skillet over medium heat for 4 to 6 minutes, turning once, until some fat has rendered but the bacon is still pliable.
- Drain the bacon on paper towels.
- Divide the green beans into 12 equal bundles.
- Wrap each bundle with one half-slice of bacon and place it seam-side down on the prepared baking sheet.
- Melt the butter in a small saucepan over low heat.
- Stir in the brown sugar, garlic powder, and black pepper until combined.
- Spoon the glaze evenly over the bundles.
- Bake for 20 to 25 minutes, until the bacon is crisp and the beans are tender.
- Rest the bundles for 5 minutes before serving.