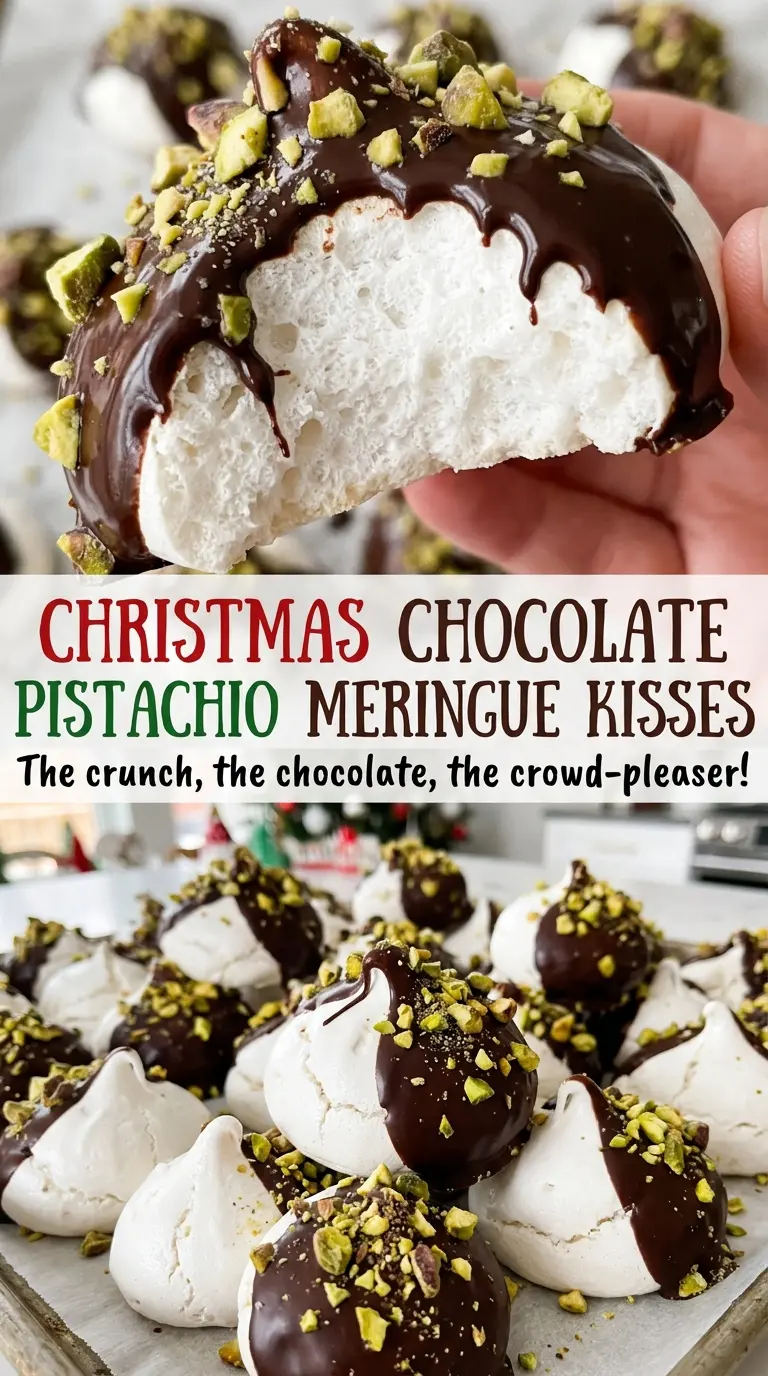
The whites look loose and foamy at first, then turn glossy as the sugar disappears into them. That slow change is what gives these Christmas Chocolate Pistachio Meringue Kisses their smooth, sturdy peaks instead of a gritty shell that cracks before it reaches the oven. I pipe them small, so each one dries through without picking up color.
These are crisp, light kisses with a firm chocolate base and a little pistachio crunch. The oven stays low, and the meringues rest inside after the heat is off; that patient finish keeps the outsides dry without asking the centers to brown. Once the chocolate sets, they’re ready for a cookie plate or a tin of homemade treats.

Kitchen Note
Add the sugar one tablespoon at a time, then rub a little meringue between your fingers before you stop beating. If it still feels sandy, keep mixing; a smooth, dissolved-sugar meringue gives you a finer, glossier finish.
Save these chocolate pistachio meringue kisses for crisp little treats with glossy peaks and a crunchy chocolate-dipped base.
Why These Kisses Dry at 200°F Instead of Turning Golden
Meringue kisses aren’t meant to bake like cookies. At 200°F, they dry slowly, so the shells set without browning and keep their pale finish. A hotter oven can color the outside before the middle has dried, leaving you with a crisp shell and a tacky center.
The small, consistent shape matters just as much as the low heat. Kisses piped about 1 inch wide and 1 1/2 inches tall dry at a similar rate, which is why I keep them close to that size rather than piping a mix of tall and squat shapes. After baking, the closed oven gives them a gradual cool-down instead of a sharp temperature change. The finished kisses should lift cleanly from the parchment, not cling or bend. That dry shell is what holds up under the chocolate and keeps the centers light.
What Each Ingredient Is Doing in These Chocolate-Dipped Meringues
- Egg whites — Room-temperature whites whip more readily than cold ones, and clean separation matters: even a trace of yolk can interfere with the foam. Fresh eggs are a dependable choice here; carton whites vary, so they may not build the same volume or stiffness.
- Cream of tartar — This acid helps stabilize the whipped whites as they expand. I wouldn’t leave it out if you want the meringue to hold its shape; there isn’t a direct swap in this ingredient list that gives the same predictable result.
- Granulated sugar — Regular granulated sugar creates the structure and sweetness. Add it gradually rather than dumping it in, so it has time to incorporate into the foam instead of weighing down the whites.
- Vanilla extract — Vanilla rounds out the sweetness without competing with the bittersweet coating. A standard bottle works well; if you don’t have it, you can omit it rather than add another flavor that changes the balance.
- Bittersweet chocolate and vegetable oil — Bittersweet chocolate keeps the coating from tasting as sweet as the meringue. The oil loosens the melted chocolate so the bases dip smoothly; semisweet chocolate works in the same amount if you prefer a sweeter coating.
- Unsalted shelled pistachios — Finely chopped pieces cling neatly to the chocolate and bring a crisp, nutty contrast. Fresh pistachios taste brighter than stale ones, and unsalted gives you control over the finished sweetness and saltiness.
How to Whip, Dry, and Dip the Kisses Without Losing Their Shape
Build a stable, glossy meringue
Heat the oven to 200°F and line an 18×13-inch rimmed baking sheet with parchment. In a clean, dry bowl, beat the room-temperature egg whites with the cream of tartar and salt on medium until foamy and soft peaks form, about 2 minutes. With the mixer running on medium-high, add the sugar a tablespoon at a time, then beat for 7 to 10 minutes until the meringue is stiff and glossy. Beat in the vanilla just until combined.
Pipe evenly sized kisses
Fit a piping bag with a 1/2-inch round tip and transfer the meringue into the bag. Pipe 36 kisses onto the prepared sheet, aiming for about 1 inch wide and 1 1/2 inches tall. Keep the tips upright as you finish each kiss so the peaks stay neat. Leave a little space between them so you can lift each one cleanly after baking.
Dry them slowly in the oven
Bake for 1 hour 45 minutes to 2 hours, until the kisses feel dry and lift cleanly from the parchment. If one still sticks, give the tray more time rather than pulling the kisses off by force. Turn off the oven and leave the meringues inside with the door closed for 1 hour. Remove the tray and let the kisses cool completely on it before dipping.
Dip the bases and add pistachios
Put the finely chopped bittersweet chocolate and vegetable oil in a microwave-safe bowl. Microwave at 50% power in 30-second intervals, stirring between each one, until smooth; the stirring helps distribute the heat before the chocolate scorches at the edges. Dip the base of each cooled kiss into the chocolate, sprinkle with finely chopped pistachios, and set it back on the parchment. Let the coating set at room temperature for about 30 minutes.
Three Easy Ways to Change the Chocolate-Pistachio Finish
Skip the pistachios for a nut-free-style finish
Leave the pistachios off and let the chocolate base set plain. You’ll lose the crunchy, nutty topping but keep the bittersweet snap. This removes pistachios from the recipe, but it doesn’t by itself make the kisses safe for someone with a nut allergy because ingredients and equipment can have cross-contact.
Drizzle instead of dipping
Use the melted chocolate to drizzle thin lines over the cooled kisses, then add the chopped pistachios while the chocolate is still wet. This uses the same coating ingredients but leaves more of the white meringue visible and gives each bite a lighter chocolate finish.
Keep them plain vanilla
Leave off the chocolate, oil, and pistachios for a simple vanilla meringue kiss. The result is lighter and less rich, with no chocolate shell to set; keep the meringues on the parchment until they’re completely cool.
Storage and Reheating
- Room temperature: Store the cooled, set kisses in an airtight container in a cool, dry spot for up to 5 days. Humidity can make the meringue tacky.
- Freezer: Freezing isn’t recommended; condensation as they thaw can soften the crisp shells and make the chocolate look cloudy.
- Reheating: These are served at room temperature and don’t need reheating. Avoid the microwave, which can soften the meringue and melt the chocolate coating.
Questions That Come Up When Making Meringue Kisses
Christmas Chocolate Pistachio Meringue Kisses
Ingredients
Equipment
Method
- Heat the oven to 200°F and line an 18x13-inch rimmed baking sheet with parchment paper.
- In a clean, dry bowl, beat the egg whites, cream of tartar, and salt with an electric mixer on medium speed until foamy and soft peaks form, about 2 minutes.
- With the mixer running on medium-high, add the sugar 1 tablespoon at a time, then beat until the meringue is stiff and glossy and the sugar feels dissolved when rubbed between your fingers, 7 to 10 minutes.
- Beat in the vanilla extract until combined.
- Transfer the meringue to a piping bag fitted with a 1/2-inch round tip and pipe 36 kisses, about 1 inch wide and 1 1/2 inches tall, onto the prepared baking sheet.
- Bake for 1 hour 45 minutes to 2 hours, until the kisses are dry and lift cleanly from the parchment, then turn off the oven and leave them inside with the door closed for 1 hour.
- Remove the kisses from the oven and cool completely on the baking sheet.
- Place the chocolate and vegetable oil in a microwave-safe bowl and microwave at 50% power in 30-second intervals, stirring between intervals, until smooth.
- Dip the base of each cooled kiss in the melted chocolate.
- Sprinkle the dipped kisses with pistachios and return them to the parchment.
- Let the chocolate set at room temperature for about 30 minutes before serving.