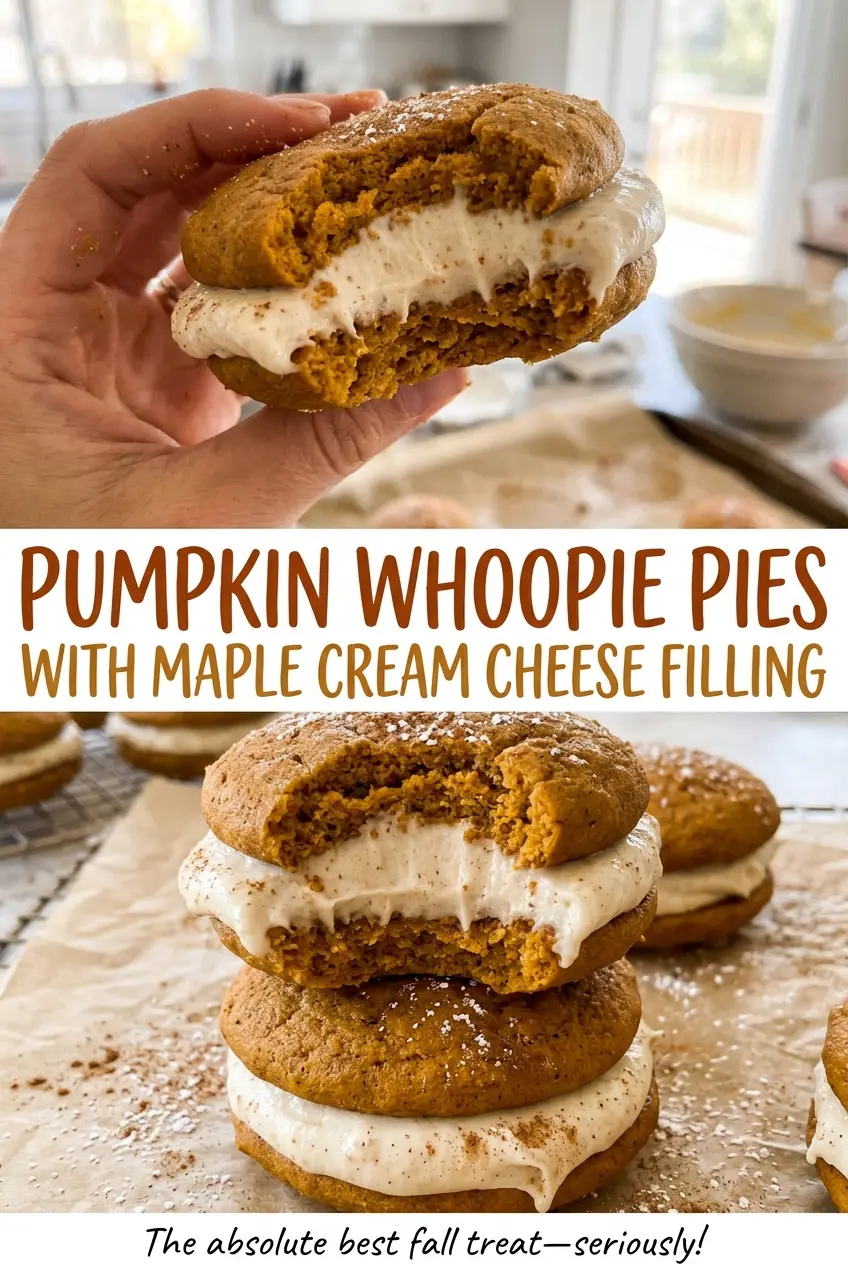
The pumpkin rounds come out of the oven soft and springy, with a little lift across the tops. That cake-like texture is exactly what I want here: it gives the maple cream cheese filling a tender cookie to sit between without crumbling when you take a bite. These pumpkin whoopie pies are a sandwich-cookie kind of treat, but the cookies themselves are closer to little pumpkin cakes.
I use plain pumpkin puree and neutral oil to keep the crumb moist, then pair the earthy pumpkin with cinnamon, ginger, and nutmeg. Stirring the batter only until the dry streaks disappear keeps the cookies tender, while the filling brings a cool, tangy contrast and a clear maple note. Once the pies have chilled, the filling settles into a neat layer between those soft spiced rounds.
Kitchen Note
Give the filling its full 20 minutes in the refrigerator before spreading it. It should hold its shape on a spoon rather than run off the cookie, which makes assembly much tidier.
Save these pumpkin whoopie pies for a bake with soft, spiced cookies and maple cream cheese filling tucked between every pair.
Why Pumpkin Whoopie Pies Bake Up Like Little Cakes, Not Crisp Cookies
It helps to think of these as small pumpkin cakes with flat sides, not as crisp cookies that happen to hold filling. Pumpkin puree brings moisture to the batter, and the baking powder and baking soda give each portion lift in the oven. The result should feel soft and springy when you press a cooled cookie gently, not crunchy at the edge or chewy like a classic drop cookie.
That distinction matters when you judge the bake. Waiting for browning or a firm, dry surface can leave these rounds overbaked; the tops spring back when lightly touched, and the cookies continue to settle as they cool. Their tender texture is also why they pair well with a firm, chilled filling. Keep the portions even and the sandwiches will feel balanced, with enough cookie to hold the cream cheese center without burying its maple flavor.
What Pumpkin, Oil, and Maple Each Bring to These Whoopie Pies

- Pumpkin puree — Use plain canned pumpkin puree, not pumpkin pie filling, which is already sweetened and spiced. Canned puree is convenient and consistent; there’s no need to buy a specialty brand. The puree supplies moisture and pumpkin flavor, so swapping in pie filling changes the sweetness and seasoning of the cookies.
- Neutral oil — A neutral-tasting oil keeps the pumpkin flavor in front and helps the crumb stay tender. Canola, vegetable, or another neutral oil works in its place; strongly flavored oils will show through. There’s no need to splurge on a premium bottle for this batter.
- Light brown and granulated sugars — The combination gives the cookies sweetness without making the brown sugar flavor dominate. Ordinary granulated sugar and a fresh, soft brown sugar work well. Pack the brown sugar so its amount is consistent; dark brown sugar will bring a stronger molasses note.
- All-purpose flour and leaveners — All-purpose flour gives the rounds enough structure to sandwich, while baking powder and baking soda help them rise. A standard store-brand flour is fine here. For a gluten-free version, use a one-to-one baking blend formulated to replace all-purpose flour; the texture may be a little more delicate.
- Cinnamon, ginger, and nutmeg — Together, these spices make the pumpkin taste warm and rounded without relying on a premixed blend. Fresh, fragrant spices make a noticeable difference, but everyday ground spices are perfectly suitable. If a jar smells faint, the flavor in the baked cookies will be muted.
- Eggs and vanilla — The eggs help hold the pumpkin batter together, and vanilla rounds out both the cookie and the filling. Large eggs are the right size for the balance here. Use pure vanilla when you have it; a standard imitation vanilla extract also works.
- Block cream cheese and unsalted butter — These make a smooth, tangy filling that can be spread between the cookies. Use softened block cream cheese rather than tub-style whipped cream cheese, which is looser and can leave the filling less stable. A regular unsalted butter is all you need; let both ingredients soften so they beat together evenly.
- Powdered sugar and pure maple syrup — Powdered sugar gives the filling its body, while pure maple syrup supplies the distinct maple flavor. Choose pure maple syrup rather than pancake syrup if you want that clean maple taste. A less expensive powdered sugar works just as well as a premium brand.
How to Bake the Rounds and Build a Neat Sandwich
Whisk the Spices Through the Flour
Heat the oven to 350°F and line two baking sheets with parchment paper. Whisk the flour, baking powder, baking soda, cinnamon, ginger, nutmeg, and salt in a medium bowl so the leaveners and spices are distributed throughout. In a separate large bowl, whisk the oil with both sugars, then whisk in the eggs, pumpkin puree, and vanilla. The wet mixture will look thick and orange, with the sugars evenly worked in.
Bring the Pumpkin Batter Together Gently
Add the flour mixture to the pumpkin mixture and stir just until no dry streaks remain. The batter will be thick and soft rather than firm enough to roll, so use a spoon to portion it. Overworking it after the flour disappears can make the finished rounds tougher than they should be. Scoop 2 tablespoons for each cookie and leave about 2 inches between portions so they have room to bake.
Bake Until the Tops Spring Back
Bake in batches with one sheet on each oven rack for 12–14 minutes, switching the rack positions halfway through. The tops should spring back when lightly touched; don’t wait for them to look browned and crisp. If you’re baking a batch near the shorter end of the time range, use that gentle touch as your cue rather than relying on color alone. The two sheets won’t bake evenly unless you swap their rack positions halfway.
Cool the Cookies and Beat the Filling
Leave the cookies on their sheets for 5 minutes, then move them to a wire rack and cool completely. For the filling, beat the softened cream cheese and butter until smooth and fluffy, about 2 minutes. Beat in the powdered sugar one cup at a time, then add the maple syrup, vanilla, and salt and beat until smooth. Refrigerate the filling for 20 minutes before spreading it.
Pair, Fill, and Let the Sandwiches Set
Match the cooled cookies by size so each sandwich sits evenly. Spread about 2 tablespoons of filling on the flat side of half the cookies, then top with the remaining rounds and press gently until the filling reaches the edges. Arrange the whoopie pies in an airtight container and refrigerate for at least 30 minutes to set. Keep them refrigerated after that, too.
Three Useful Ways to Adapt These Pumpkin Whoopie Pies
Make the Cookies Gluten-Free
Replace the all-purpose flour with the same amount of a one-to-one gluten-free baking blend that includes xanthan gum. The rounds may have a slightly more delicate crumb, so cool them fully on the baking sheets before moving them to the rack.
Use Dairy-Free Cream Cheese and Butter
For a dairy-free filling, replace the cream cheese and butter with dairy-free versions in the same amounts. Choose a firm block-style dairy-free cream cheese if available; softer products can make the filling looser, and the maple filling may taste less tangy than the original.
Let the Pumpkin Spices Lead
Leave the maple syrup out of the filling if you want the cream cheese tang to stand out more. The filling will lose its maple note and set a touch firmer, while the cinnamon, ginger, and nutmeg in the cookies stay front and center.
Storage and Reheating
- Refrigerator: Keep the assembled whoopie pies in an airtight container for up to 3 days. The cookies soften a little more as they sit against the filling.
- Freezer: Freeze the unfilled cookies in an airtight container with parchment between layers for up to 2 months. Thaw them before making a fresh batch of filling and assembling.
- Reheating: These are best served chilled or cool, not reheated. Warming an assembled whoopie pie softens the cream cheese filling and can make it squeeze out.
Questions That Come Up When Making Pumpkin Whoopie Pies
Pumpkin Whoopie Pies with Maple Cream Cheese Filling
Ingredients
Equipment
Method
- Heat the oven to 350°F and line two baking sheets with parchment paper.
- In a medium bowl, whisk together the flour, baking powder, baking soda, cinnamon, ginger, nutmeg, and salt.
- In a large bowl, whisk the oil, brown sugar, and granulated sugar until combined.
- Whisk in the eggs, pumpkin puree, and vanilla.
- Add the flour mixture to the pumpkin mixture and stir just until no dry streaks remain.
- Drop 2 tablespoons of batter per cookie onto the prepared sheets, spacing the portions about 2 inches apart.
- Bake in batches, with one sheet on each oven rack, for 12–14 minutes, switching rack positions halfway through, until the tops spring back when lightly touched.
- Cool the cookies on the sheets for 5 minutes.
- Transfer the cookies to a wire rack and cool completely.
- In a large bowl, beat the cream cheese and butter until smooth and fluffy, about 2 minutes.
- Beat in the powdered sugar, 1 cup at a time.
- Beat in the maple syrup, vanilla, and salt until smooth.
- Refrigerate the filling for 20 minutes, until firm enough to spread.
- Pair the cookies by size.
- Spread about 2 tablespoons of filling on the flat side of half of them.
- Top with the remaining cookies and press gently to the edges.
- Refrigerate the whoopie pies in an airtight container for at least 30 minutes to set; keep refrigerated.