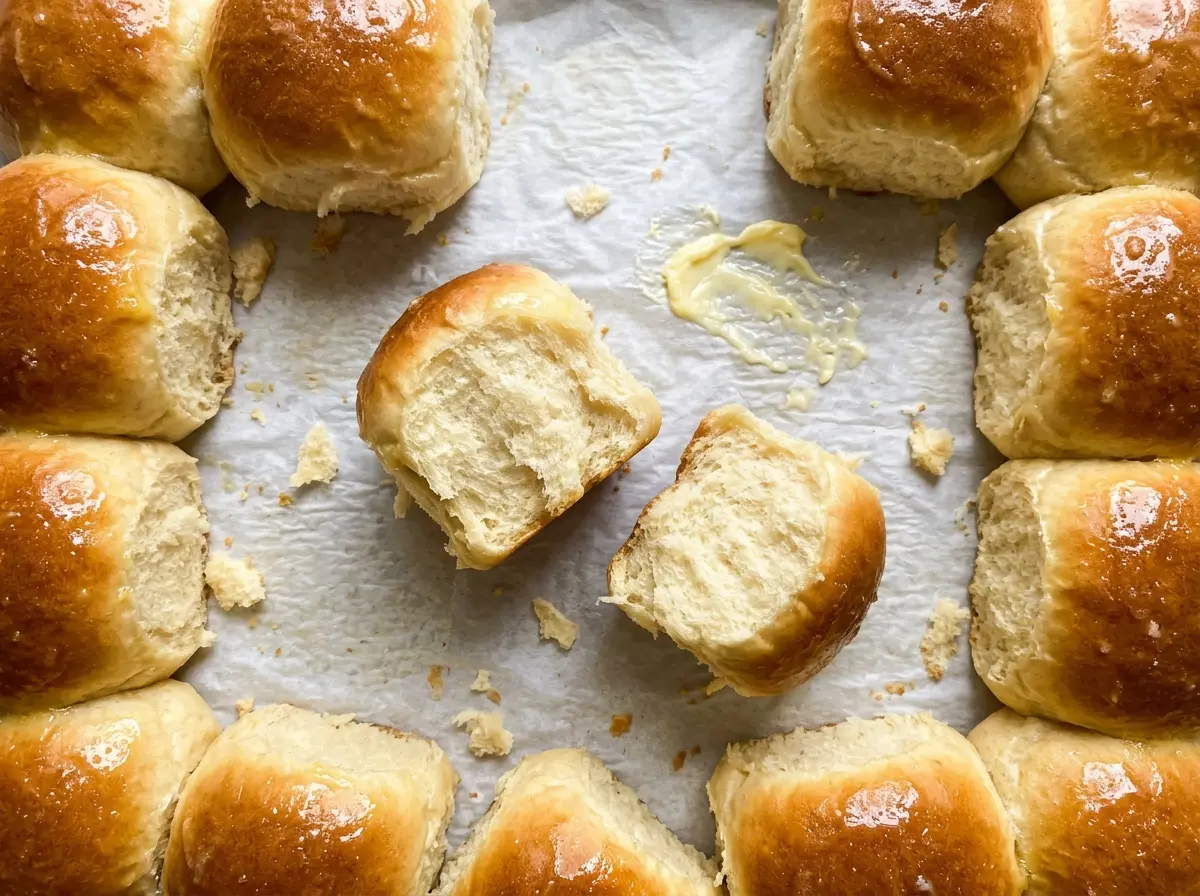
The yeast mixture starts quiet, then turns foamy around the edges after a few minutes; that’s the first sign these rolls are headed in the right direction. I make these Texas Roadhouse Style Dinner Rolls when I want a soft, slightly sweet roll with a buttery top and enough structure to pull apart without crumbling. The dough is enriched with milk, egg, honey, and butter, so it feels more supple than a basic bread dough.
What makes the texture work is kneading until the dough is smooth but still a little tacky, rather than adding flour until it feels dry and easy to handle. A lightly greased counter gives you room to work without toughening the dough. Once it has risen twice, the rolls bake into tender rectangles with golden tops and soft sides, ready for that last brush of butter.
Kitchen Note
Give the yeast its full 5 to 10 minutes in the warm water and sugar. When the surface looks foamy, you know it has started activating; a flat mixture is a reason to pause before building the dough.
Save these Texas Roadhouse Style Dinner Rolls for their soft, pull-apart crumb and buttery golden tops.
Why These Rolls Should Feel Slightly Tacky Before the First Rise
A dry dough is easier to handle at first, but it’s not the texture you want to aim for here. The milk, egg, honey, and butter make this dough soft and rich, and it should feel slightly tacky after kneading. That little bit of moisture helps the baked rolls stay tender instead of turning firm and bready.
Flour absorbs liquid differently depending on the brand and how it has been stored, so use the dough itself as your cue. If it clings heavily to your hands and looks rough, keep kneading on the lightly greased counter until it smooths out. If it feels soft and just a little sticky, resist adding extra flour. The dough should become elastic and hold together, not leave a wet smear across the counter.
That texture also makes shaping easier once the first rise is complete. Press the dough down gently, then roll it into the specified rectangle without forcing it into shape with handfuls of flour. A little spring-back is normal; give the dough a moment to relax, then continue rolling to the same thickness.
The Yeast, Honey, and Milk Choices Behind These Soft Rolls

- Active dry yeast — This is the yeast used for the foaming step, so choose active dry rather than treating instant yeast as a direct swap. Freshness matters more than brand; yeast that has been open for a long time may not activate reliably.
- Whole milk — Milk adds richness and gives the dough a softer crumb than water alone. Warm it gently and check that it reaches 105–110°F before mixing; overheated milk can undermine the yeast.
- Honey and granulated sugar — The honey gives these rolls their gentle sweetness, while the sugar is divided between activating the yeast and mixing the dough. Use ordinary granulated sugar and a honey you enjoy the taste of; a strongly flavored honey will come through more clearly.
- Egg and unsalted butter — The egg contributes structure and tenderness, and the butter enriches the dough. Melt and cool the butter before mixing so it blends into the liquid ingredients without being hot. Unsalted butter keeps the salt level controlled.
- All-purpose flour and kosher salt — All-purpose flour gives these rolls a tender bite without making them overly chewy. Measure the flour carefully and add it with the salt to form a shaggy dough before kneading; the salt seasons the bread and balances its sweetness.
From Foamy Yeast to Golden Tops: The Roll-Making Cues That Matter
Let the yeast turn foamy
Stir the warm water, active dry yeast, and a teaspoon of the sugar in a small bowl. Leave the mixture for 5–10 minutes, until a foamy layer appears. While it stands, warm the milk to 105–110°F; it should feel warm, not hot. Whisk the milk into the yeast mixture with the remaining sugar, honey, egg, and four tablespoons of the melted, cooled butter.
Knead until smooth, not dry
Stir in the flour and salt until the mixture forms a shaggy dough. Turn it onto a lightly greased counter and knead by hand for 8–10 minutes. At first, it will look uneven and feel sticky, but it should become smooth and slightly tacky as you work. If you keep adding flour to make it feel completely dry, the rolls can turn dense.
Give the dough its first rise, then shape
Lightly coat a large bowl with nonstick cooking spray, add the dough, and cover it. Let it rise in a warm place for 60–90 minutes, until doubled in size. Gently press it down and roll it into a 12-by-16-inch rectangle about ½ inch thick. Cut 24 rectangles, each about 2 by 4 inches; keeping them close in size helps them bake evenly.
Let the cut rolls puff in the pans
Lightly grease two 9-by-13-inch baking pans and arrange 12 rolls in each. Cover the pans and let the rolls rise for 30–45 minutes, until puffy. Start preheating the oven to 350°F during this rise so it’s ready when the dough is. If the rolls still look compact, give them the full rise rather than rushing them into the oven.
Rotate the pans and finish with butter
Bake the pans on the upper-middle and lower-middle oven racks for 15–18 minutes, until the tops are golden brown. Halfway through, swap the rack positions and rotate the pans so both get a more even share of the oven’s heat. Brush the hot rolls with the remaining tablespoon of butter. Let them rest in the pans for 5 minutes before serving.
Small Changes That Still Keep These Dinner Rolls Tender
Shape them as round pull-apart rolls
For a round shape, divide the risen dough into 24 similar portions and tuck the edges underneath each piece to form a smooth top. Arrange 12 in each greased pan. The rounded shape gives you more soft sides and a different look while keeping the same tender dough.
Make the dough dairy-free
Replace the whole milk with unsweetened plain soy milk in the same amount, and use dairy-free butter in place of the unsalted butter for both the dough and the finish. The rolls will be a little less rich, and the egg remains, so this adaptation is dairy-free but not egg-free.
Storage and Reheating
- Refrigerator: Store cooled rolls in an airtight container for up to 4 days; chilling makes bread firm sooner than storing it at room temperature.
- Freezer: Freeze the fully cooled rolls in an airtight freezer bag for up to 2 months. Thaw them while still wrapped so they don’t dry out.
- Reheating: Warm the rolls briefly in a low oven, loosely covered, until soft. Avoid heating them uncovered for too long, which dries the edges.
Questions That Come Up While These Rolls Rise and Bake
Texas Roadhouse Style Dinner Rolls
Ingredients
Equipment
Method
- Stir the warm water, yeast, and 1 teaspoon of the sugar together in a small bowl; let stand for 5–10 minutes, until foamy.
- Warm the milk to 105–110°F.
- Whisk the warm milk into the yeast mixture with the remaining sugar, honey, egg, and 4 tablespoons of the butter.
- Stir in the flour and salt until a shaggy dough forms.
- Knead by hand on a lightly greased counter for 8–10 minutes, until smooth and slightly tacky.
- Lightly grease a large bowl with cooking spray, add the dough, and cover; let rise in a warm place for 60–90 minutes, until doubled in size.
- Lightly grease two 9x13-inch baking pans with cooking spray.
- Gently press down the dough.
- Roll the dough into a 12x16-inch rectangle about 1/2 inch thick.
- Cut the dough into 24 rectangles, each about 2x4 inches.
- Arrange 12 rolls in each pan and cover.
- Let the rolls rise for 30–45 minutes, until puffy.
- Preheat the oven to 350°F during the rise.
- Bake on upper-middle and lower-middle oven racks for 15–18 minutes, swapping rack positions and rotating the pans halfway through, until the tops are golden brown.
- Brush the hot rolls with the remaining 1 tablespoon butter.
- Let the rolls rest in the pans for 5 minutes before serving.