Ultimate American BBQ Ribs with Homemade Sauce
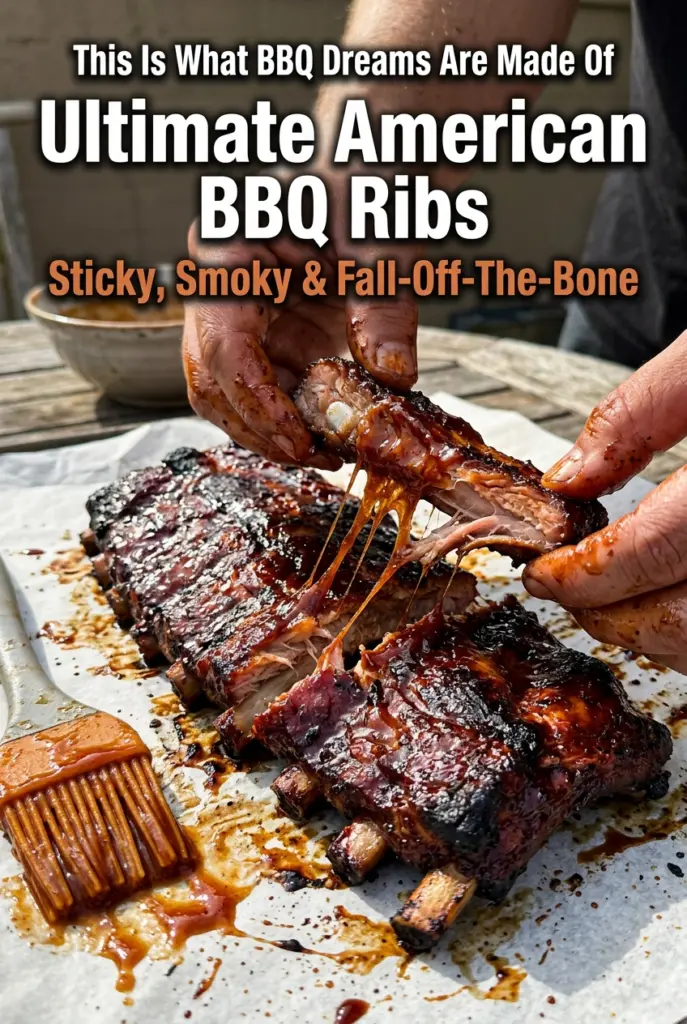
These BBQ ribs land with that perfect mix of tenderness and sticky char: the meat pulls clean from the bone, but it still has enough structure to slice without falling…
Tip: save now, cook later.These BBQ ribs land with that perfect mix of tenderness and sticky char: the meat pulls clean from the bone, but it still has enough structure to slice without falling apart on the board. The homemade sauce bakes down into something glossy and concentrated, then picks up a dark, caramelized edge on the grill that tastes like you spent all day tending a smoker.
The two things that matter most here are removing the membrane and giving the sauce enough time to cook down before it ever touches the ribs. Skip the membrane and the seasoning can’t really get where it needs to go. Rush the sauce and it stays thin and sharp instead of turning thick, smoky, and clingy. The oven does the heavy lifting, which keeps the ribs tender and predictable, and the grill at the end gives you the flavor and finish that make these taste like real barbecue.
You’ll find the timing that gets the ribs tender without drying them out, plus the small details that keep the sauce from tasting flat. There’s also a few smart swaps if you need to adjust the heat or work with what’s already in your pantry.
The ribs were fall-apart tender after 3 hours, and the sauce got thick and sticky instead of watery. My husband kept sneaking pieces off the platter before I even got them sliced.
Save these sticky oven-to-grill BBQ ribs for the kind of dinner that needs a tender, smoky finish and a sauce that clings to every bite.
The Membrane Is What Keeps Ribs Tough If You Leave It On
That thin silver skin on the back of the rack is the difference between ribs that taste seasoned all the way through and ribs that still feel a little barricaded from the rub. It doesn’t melt into tenderness in the oven. It tightens up and turns chewy, which is why the first real step here is worth the small bit of effort.
The other thing that trips people up is expecting the grill to do the tenderizing. It won’t. The grill is for finish and caramelization, not rescue work. The ribs need that long, gentle oven time so the connective tissue softens first, then the sauce can set and char instead of burning before the meat is ready.
- Pork baby back ribs — Baby backs cook a little faster than spare ribs and give you that clean pull from the bone without needing an all-day smoke session. If you use spare ribs, add some time and watch for tenderness instead of relying on the clock.
- Olive oil — This helps the dry rub stick evenly and keeps the surface from looking patchy after baking. Any neutral oil works here; the flavor isn’t the point.
- Smoked paprika — This does a lot of the heavy lifting for that barbecue flavor in an oven-baked rib. Don’t swap it for sweet paprika unless you’re okay losing some depth.
- Apple cider vinegar — The vinegar keeps the sauce from tasting flat and helps cut through the richness of the pork. Regular distilled vinegar is sharper, so use a little less if that’s what you have.
- Worcestershire sauce — This adds the savory backbone that makes the sauce taste cooked, not just mixed. There isn’t a perfect substitute, but a splash of soy sauce plus a little extra vinegar gets you close.
How to Get Tender Ribs Before the Sauce Ever Hits the Grill
Pulling the membrane and seasoning the rack
Slide a butter knife under the membrane at the back of the ribs, then grab it with a paper towel and pull in one long sheet if you can. If it tears, start again at a fresh edge; a little patience here pays off in texture later. Rub the ribs with oil first, then massage the spice mix over every surface so it forms an even crust instead of clumping in wet patches.
Wrapping for the low oven bake
Wrap the ribs tightly in heavy-duty foil with the meat side facing up. The foil traps steam and keeps the ribs tender, which is exactly what you want during the long bake. If the packet isn’t sealed well, the ribs can dry out before the connective tissue has time to soften.
Cooking the sauce until it turns glossy
Combine the sauce ingredients in a saucepan and bring them to a gentle simmer over medium heat, then drop the heat to low. You’re not looking for a hard boil; that can make the sugars taste harsh and cook off the vinegar too fast. After 20 to 25 minutes, the sauce should coat a spoon and leave a trail when you drag a finger through it.
Finishing on the grill without burning the glaze
Brush the ribs generously with sauce, then grill them over medium-high heat just long enough to pick up char marks and a sticky finish. The biggest mistake here is walking away too long. Sugar burns fast once it’s over direct heat, so stay close, flip when the glaze darkens, and add the last layer of sauce after the ribs come off the hottest part of the grill.
What to Change When You Want Different Heat, Less Sugar, or No Grill
Dairy-Free and Gluten-Free Friendly
This recipe already lands naturally in both categories as written, as long as your Worcestershire sauce is gluten-free. Check the bottle if that matters for your kitchen, because some brands use malt vinegar or other gluten-containing ingredients. The result stays the same: tender ribs with a sticky sauce that doesn’t rely on any dairy or flour thickeners.
Less Sweet, More Tangy
Cut the brown sugar in the sauce by a few tablespoons and add a touch more vinegar. You’ll lose a little of that classic sticky barbecue finish, but the sauce will taste sharper and less candy-sweet, which works well if you like ribs that lean savory.
No Grill, No Problem
Finish the sauced ribs under a hot broiler for 2 to 4 minutes instead of grilling. Keep them a few inches from the heat and watch them closely, because the sauce can go from glossy to burnt fast. You won’t get grill marks, but you’ll still get a dark, caramelized top.
Spicier Ribs
Increase the cayenne in both the rub and sauce, or add a spoonful of hot sauce to the saucepan. That pushes the ribs into a deeper, warmer heat without changing the texture. The sweetness is still there, but it stops being the first thing you taste.
Storage and Reheating
- Refrigerator: Store leftover ribs in an airtight container for up to 4 days. The sauce will set up more firmly in the fridge, which is normal.
- Freezer: Freeze tightly wrapped portions for up to 2 months. Wrap the ribs before saucing if you want the best texture after thawing, then warm and glaze again.
- Reheating: Reheat covered in a 300°F oven with a splash of water or extra sauce until hot. The common mistake is blasting them uncovered at high heat, which dries out the edges before the center warms through.
Answers to the Questions Worth Asking

Ultimate American BBQ Ribs with Homemade Sauce
Ingredients
Equipment
Method
- Remove the silver membrane from the back of each rack by sliding a butter knife under the edge, gripping with a paper towel, and pulling it off in one long strip.
- Pat the ribs dry with paper towels, then rub both sides with olive oil.
- Mix the dry rub spices and massage the full mixture all over both sides of the ribs.
- Cover and refrigerate the ribs for at least 2 hours or overnight for deeper flavor.
- Preheat the oven to 300°F (150°C).
- Place each rack meat-side up on large heavy-duty foil and wrap tightly, sealing all edges.
- Set the foil-wrapped racks on a large baking sheet and bake for 2.5 to 3 hours, until the meat has pulled back from the bone tips and the ribs are very tender when poked.
- Combine all sauce ingredients in a medium saucepan over medium heat and stir to combine.
- Bring the sauce to a gentle simmer, then reduce heat to low.
- Cook the sauce uncovered for 20–25 minutes, stirring occasionally, until thick and glossy, then taste and adjust seasoning.
- Carefully unwrap the ribs, keeping in mind the steam is very hot.
- Discard accumulated juices or reserve for basting.
- Preheat the grill to medium-high (about 400°F / 200°C).
- Brush both sides of the ribs generously with BBQ sauce.
- Grill the ribs meat-side down for 3–4 minutes until char marks form and the sauce begins to caramelize.
- Flip the ribs, brush the top side again with sauce, and grill another 3 minutes.
- Remove from the grill, brush with one final layer of sauce, and let rest for 5 minutes before slicing between the bones.
- Serve with extra BBQ sauce on the side.