The small pancake rounds cook quickly, so I keep an eye on the edges rather than waiting for the whole surface to look dry. Once bubbles form and the edges look set, they’re ready to flip. That timing gives these Christmas Snowman Pancakes soft centers and neat little shapes that stack without turning into a heavy pile.
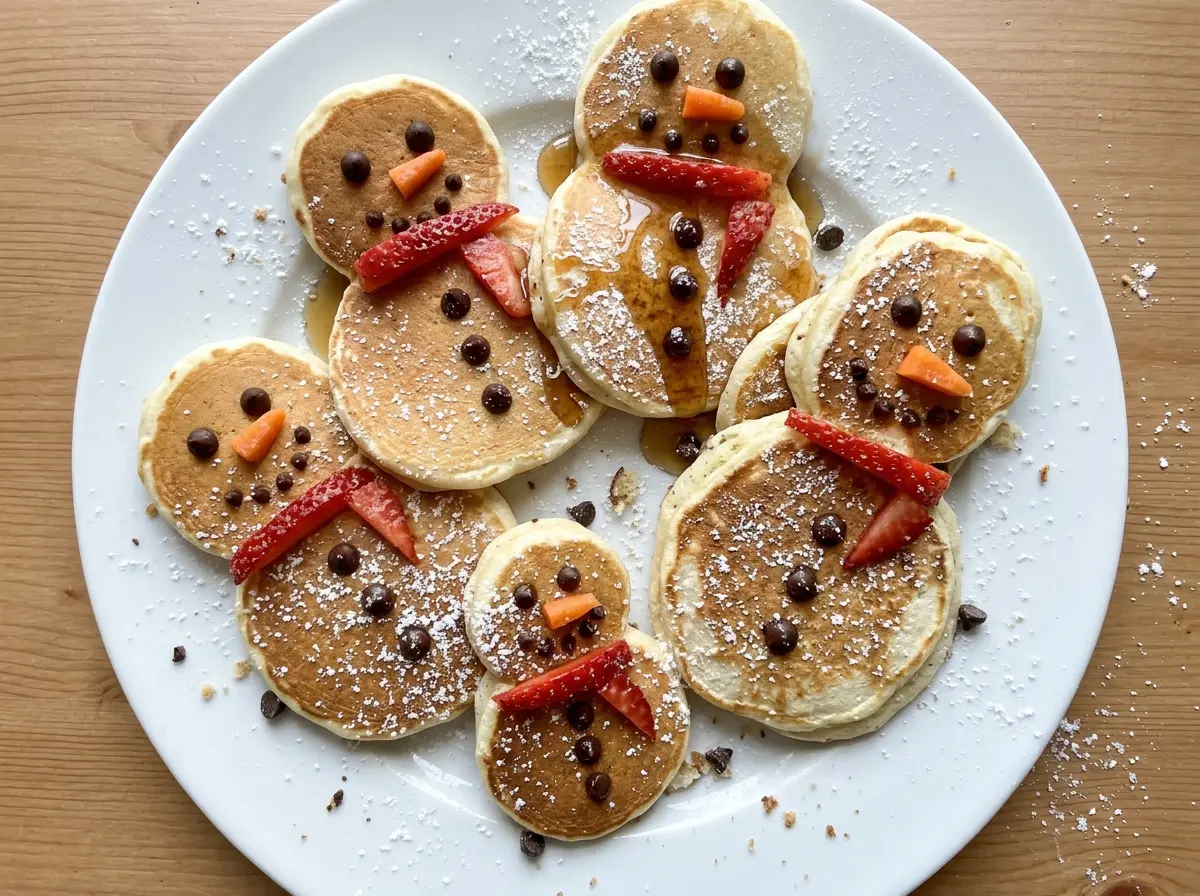
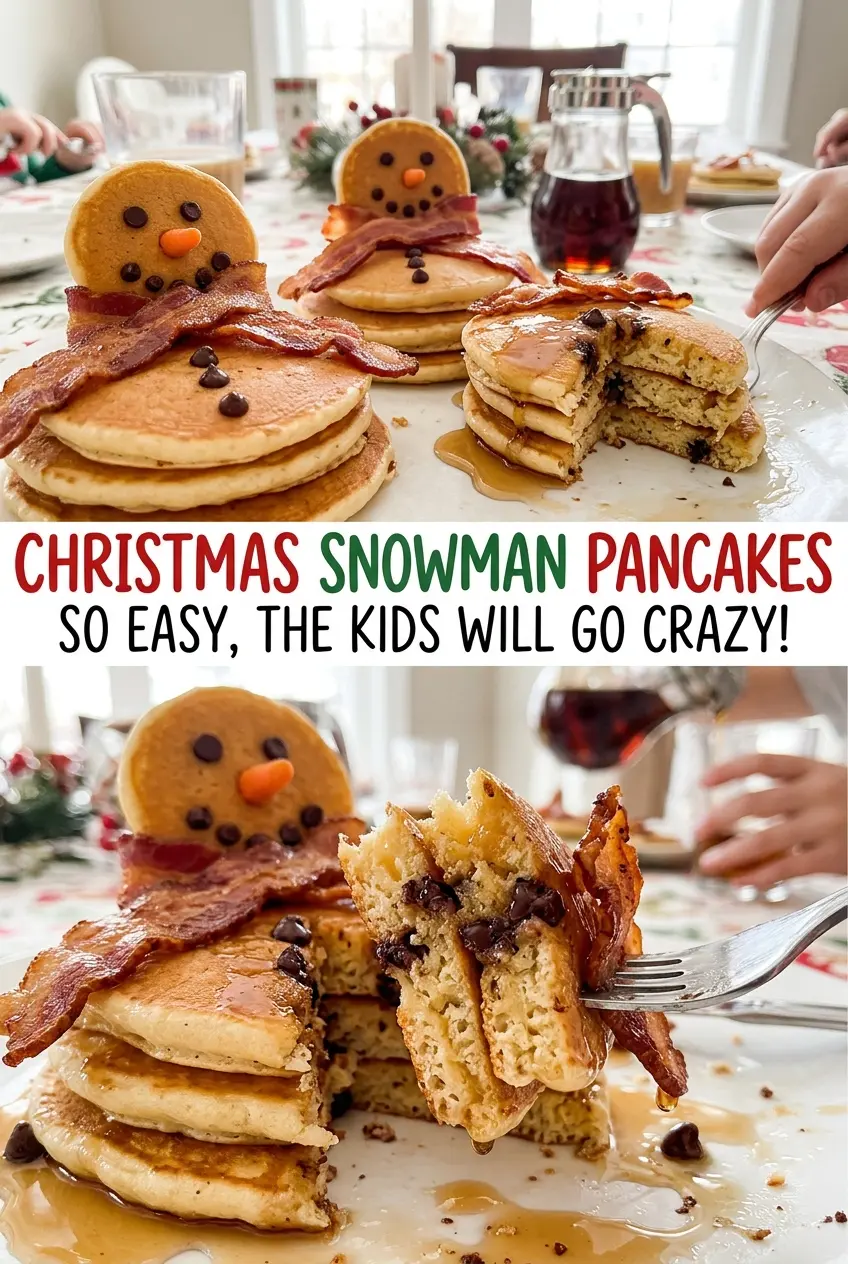
Each snowman uses three pancakes in graduated sizes: a broad base, a smaller middle, and a little round head. I cook them in batches, then hold them on a warm baking sheet while the rest finish. A few chocolate chips, a tiny carrot triangle, and a strawberry scarf make the stack recognizable without needing anything fussy. Maple syrup goes on the plates just before serving, and the warm pancakes are ready to decorate.
Kitchen Note
A few small lumps in the batter are fine, and they’re better than whisking until it’s perfectly smooth. Stop stirring as soon as the dry flour disappears so the pancakes stay tender.
Save these Christmas Snowman Pancakes for a breakfast with soft little stacks, chocolate-chip faces, and strawberry scarves.
The Three-Size Stack Is What Makes These Read as Snowmen
The decorations help, but the shape comes from getting the pancake sizes noticeably different. The largest round anchors the stack, the middle round gives the snowman a body, and the smallest one becomes the head. If the three pancakes are too close in size, the finished stack looks more like a lumpy tower than a little snowman.
That’s why I cook one of each size for every snowman instead of making a pile of identical pancakes and trying to arrange them afterward. The measured portions give you predictable proportions, and cooking them in batches of three keeps the skillet moving without crowding it. The warm baking sheet is useful here, too: pancakes stay warm while you finish the next batch, so the first snowman doesn’t go cold while you’re still cooking. Once they’re stacked, the chocolate-chip eyes and buttons, carrot nose, and strawberry scarf do the rest of the work.
Think of the decorations as small finishing touches, not a separate craft project. The face is easiest to place after the pancakes are stacked, when you can see where the head sits in relation to the body. Keep the scarf at the neck and the carrot triangle pointed outward for a clear silhouette.
Why Buttermilk and Melted Butter Matter in This Pancake Batter
- Buttermilk — Its tang works with the baking soda and gives the pancakes their tender texture. Plain milk doesn’t provide the same acidity, so it isn’t a like-for-like swap here. Use fresh buttermilk; there’s no need to seek out a specialty brand.
- All-purpose flour — It gives the batter enough structure to hold the three different pancake sizes. Spoon it into the measuring cup and level it rather than packing it down; too much flour makes a thick batter that’s harder to portion neatly. I wouldn’t substitute a self-rising flour, since the batter already contains leaveners and salt.
- Egg and melted butter — The egg helps the pancakes hold together when flipped, while butter adds richness to the crumb. Let the melted butter cool before whisking it with the buttermilk and egg; hot butter can make the mixture uneven. The recipe’s unsalted butter keeps the salt level controlled.
- Chocolate chips, carrot, and strawberry — Mini chocolate chips make small eyes and buttons that don’t overwhelm the pancakes. A small carrot is easy to cut into the tiny nose triangles, while a hulled strawberry gives you four thin scarf strips. Choose a firm strawberry so the strips hold their shape as you place them.
- Maple syrup — It’s the finishing pour, so a maple syrup you enjoy tasting is worth using. The pancakes are decorated before the syrup is divided among the plates, which keeps the faces visible at serving time.
Mixing and Cooking the Three Pancake Sizes Without Losing Their Shape
Bring the Dry and Wet Bowls Together
Whisk the flour, sugar, baking powder, baking soda, and salt in a medium bowl. In a second bowl, whisk the buttermilk, egg, and melted, cooled butter. Stir the wet mixture into the dry ingredients just until combined; the batter should look mixed, not beaten into a silky paste. Overworking it can make the finished pancakes less tender.
Warm the Skillet and the Holding Pan
Set the oven to 200°F and put a large baking sheet inside to warm. Heat a 12-inch nonstick skillet over medium-low and lightly brush it with vegetable oil. The skillet should be warm before the first portion hits it, but the heat should stay moderate so the small pancakes have time to cook through. Re-oil the skillet as needed between batches.
Cook Three Portions for Each Snowman
For each snowman, pour one 1/4-cup pancake, one 2-tablespoon pancake, and one 1-tablespoon pancake into the skillet, working in batches of three. Cook for 1–2 minutes, until bubbles form and the edges look set; those are the cues to flip, rather than relying on the clock alone. Turn each pancake and cook for about 1 minute more, then move it to the warm baking sheet. If the edges darken before bubbles appear, the skillet is too hot for this delicate batter.
Stack, Decorate, and Serve
Put one large, one medium, and one small pancake on each plate, in that order. Give each snowman two chocolate chips for eyes, a carrot triangle for a nose, and three chocolate chips for buttons. Lay a strawberry strip across the neck as a scarf, then divide the maple syrup among the plates and serve. Decorating after stacking keeps the features aligned with the snowman’s shape.
Two Easy Ways to Change the Snowman Finish
Make the Decorations Simpler
Leave off the chocolate-chip eyes and buttons and the carrot nose, but keep the strawberry scarf. The stack still reads as a snowman, with a cleaner finish and less decorating at the table.
Serve a Plain Pancake Stack
Skip the snowman decorations and stack the pancakes by size for a simple maple-syrup breakfast. You keep the same buttermilk pancake texture, but lose the crisp little face and scarf details that make the holiday version distinctive.
Storage and Reheating
- Refrigerator: Store leftover pancakes in an airtight container for up to 3–4 days. Keep the decorations and syrup separate; the strawberry softens and the syrup makes pancakes soggy.
- Freezer: Freeze undecorated pancakes in a single layer until firm, then transfer them to a freezer-safe container with parchment between layers. They keep their quality best for about 1–2 months.
- Reheating: Warm refrigerated or frozen pancakes in a toaster or microwave until hot throughout. Add the snowman decorations after reheating; microwaving the assembled stack can make the strawberry limp and the chocolate chips messy.
Answers to the Pancake Questions That Come Up
Christmas Snowman Pancakes
Ingredients
Equipment
Method
- Whisk the flour, sugar, baking powder, baking soda, and salt in a medium bowl.
- Whisk the buttermilk, egg, and melted butter in a second bowl.
- Stir the wet ingredients into the dry ingredients just until combined; a few small lumps are fine.
- Heat the oven to 200°F.
- Place a large baking sheet inside to warm.
- Heat a 12-inch nonstick skillet over medium-low heat and lightly brush it with the vegetable oil.
- For each snowman, cook one 1/4-cup pancake, one 2-tablespoon pancake, and one 1-tablespoon pancake, working in batches of three and re-oiling the skillet as needed.
- Cook for 1–2 minutes, until bubbles form and the edges look set, then flip and cook for about 1 minute.
- Transfer the pancakes to the warm baking sheet as they finish.
- Stack one large, one medium, and one small pancake on each plate.
- Decorate each snowman with 2 chocolate chips for eyes, a carrot triangle for a nose, 3 chocolate chips for buttons, and a strawberry strip across the neck as a scarf.
- Divide the maple syrup among the plates and serve.