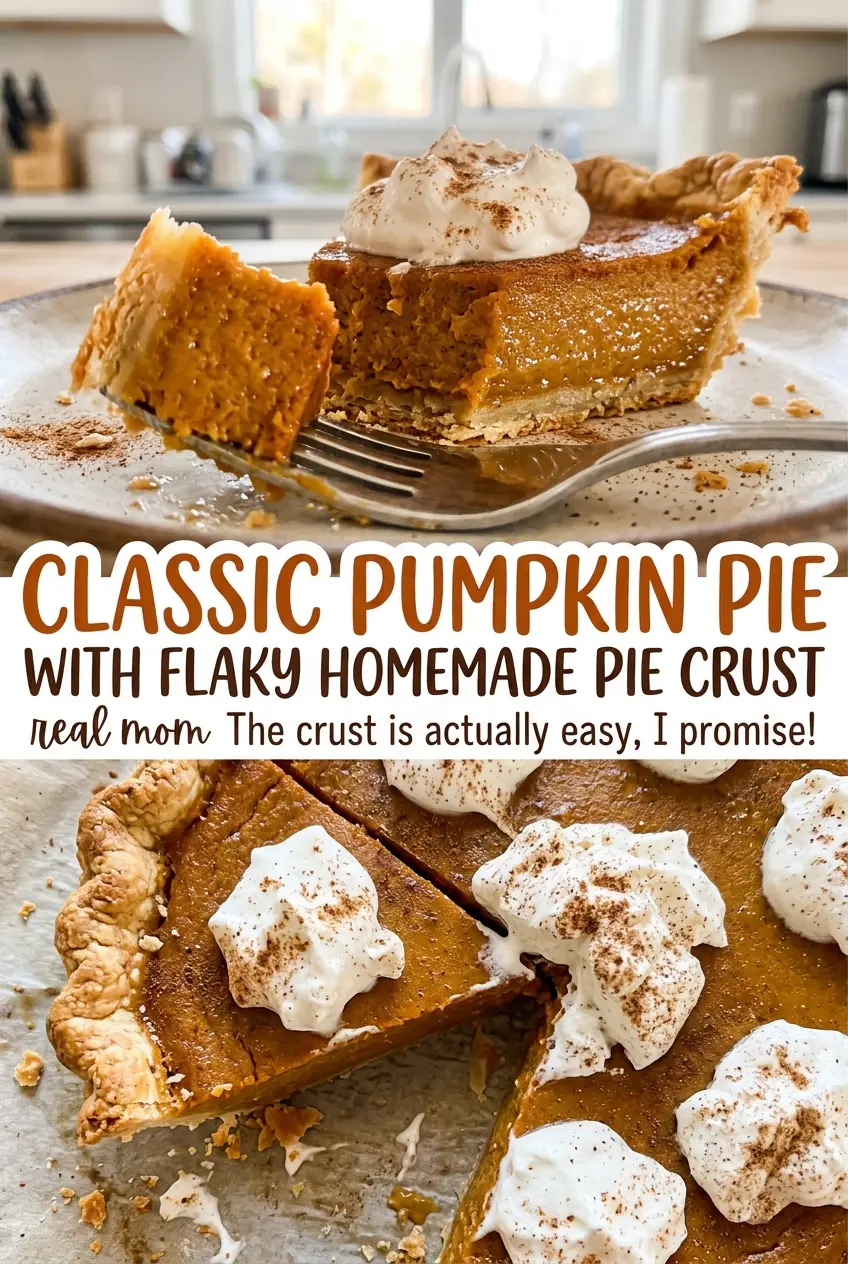
The first few minutes in the oven are when this pie starts to tell you what it’ll be: the rim of filling firms up while the center still has a soft, gentle wobble. I like that little pause before the temperature comes down; it gives the crust a strong start without leaving the custard to bake hard all the way through. This classic pumpkin pie has a buttery homemade crust and a smooth filling scented with cinnamon, ginger, and cloves.
The crust gets its flaky texture from cold butter left in small pieces, not worked into a smooth paste. I stop adding water as soon as a squeezed handful holds together, then give the dough time to chill before rolling. A hot baking sheet in the lower part of the oven helps the bottom crust bake through while the filling sets. Once the pie has cooled and chilled, the slices are neat, tender, and full of warm pumpkin spice.
Kitchen Note
Keep the butter cold and stop adding water when the dough just holds together in your hand. It may still look a little rough in the bowl; pressing it into a disk will bring it together without making the crust tough.
Save this classic pumpkin pie for a bake with a flaky butter crust and a softly set, warmly spiced filling.
Why a Hot Baking Sheet Helps the Bottom Crust Bake Through
Pumpkin filling is a wet custard, so the bottom crust needs a head start. Setting the pie plate on a rimmed baking sheet that has already heated in the oven gives the base a burst of heat right when the filling goes in. That helps the pastry start baking instead of sitting against a cool pan beneath a heavy, liquid filling.
The lower-third rack position puts the pie closer to that heat, while the first stretch at 425°F gives the crust an initial bake before the oven temperature drops. The second, gentler stretch lets the egg-and-pumpkin filling set without forcing the center to firm up too quickly. Those two oven temperatures have different jobs; skipping the hotter start changes how the crust bakes.
Use care when you transfer the filled pie plate to the hot sheet. The filling is liquid and the pan is already hot, so set the plate down steadily rather than trying to slide it into place. As the pie finishes, look for set edges and a center that still jiggles slightly when the pan moves. A firm, motionless center has gone farther than this custard needs.
What Makes the Pumpkin Filling Set Smoothly

- 100% pure pumpkin — Pure canned pumpkin provides the pumpkin flavor and body without extra sweetener or spices. Check the can carefully: pumpkin pie filling is already sweetened and seasoned, so it won’t behave like the plain pumpkin in this filling. A reliable canned brand is useful here; homemade puree varies in moisture and can make the custard looser.
- Evaporated milk — This canned milk is concentrated, which gives the filling a richer, more dependable texture than regular milk. Don’t confuse it with sweetened condensed milk; that is much sweeter and thicker and isn’t a straight swap in this pie. The inexpensive store brand works well.
- Eggs — Eggs set the filling as it bakes, turning the pumpkin mixture into a sliceable custard. Whisk them in thoroughly so there aren’t streaks of egg white, but stop once the mixture looks smooth rather than beating air into it.
- Cold salted butter — The small butter pieces in the crust create flaky layers as they bake. Salted butter is convenient and contributes seasoning to the pastry; if you use unsalted butter instead, the crust will taste a little less seasoned. Keep either kind cold and cut it into small cubes before it goes into the flour.
- Ground cinnamon, ginger, and cloves — Each spice brings a different note, and together they keep the pumpkin from tasting flat. Fresh, fragrant spices make a noticeable difference, while a supermarket brand that still smells warm when you open the jar is perfectly suitable. Use the listed spices rather than pumpkin pie spice, whose blend and proportions vary by brand.
- All-purpose flour — Regular all-purpose flour gives the crust enough structure to roll and crimp. Spoon it into the measuring cup and level it rather than packing it down; too much flour makes a dry dough that cracks as you roll.
From Pea-Size Butter to a Gently Wobbling Center
Cut the Butter into the Flour
Whisk the flour in a medium bowl, then cut in the cold, cubed butter with a pastry blender or fork. Stop when you see pea-size pieces throughout; the mixture shouldn’t look like fine sand. Drizzle in three tablespoons of ice water and toss with a fork, adding more a teaspoon at a time only if the dough won’t hold when squeezed. Gather it into a disk, wrap it, and refrigerate for one hour.
Roll and Chill the Crust
Roll the chilled dough between two sheets of parchment into a 12-inch round, lifting the parchment if it wrinkles beneath the dough. Fit the round into a 9-inch pie plate, fold the overhang under, and crimp the edge. If the dough feels soft or starts sticking, pause and chill it rather than adding flour until the surface turns dry. Refrigerate the shaped crust for 20 minutes before filling.
Whisk the Filling and Heat the Oven
Heat the oven to 425°F with a rack in the lower third and a rimmed baking sheet on the rack. In a large bowl, whisk the sugar with the cinnamon, ginger, cloves, and salt so the spices are evenly distributed. Whisk in the eggs, pumpkin, and evaporated milk until the mixture is smooth, scraping the bottom of the bowl where dry spice can collect. Pour the filling into the chilled crust only when you’re ready to set the pie plate on the hot sheet.
Bake in Two Temperatures, Then Chill
Bake for 15 minutes at 425°F, then reduce the oven to 350°F and continue baking for 35 to 45 minutes. If the crust edge is browning too quickly, cover it loosely with foil; don’t press the foil onto the filling. The edges should be set, the center should jiggle slightly, and an instant-read thermometer inserted in the center should read about 175°F. Cool the pie on a rack for two hours, then refrigerate it for at least two hours before serving.
Small Changes for a Different Pumpkin Pie
A gluten-free crust
Replace the all-purpose flour with a measure-for-measure gluten-free baking blend intended for pastry. The crust may be more delicate to handle, so roll it between parchment and lift it into the pie plate carefully; the spiced pumpkin filling stays the same.
A gentler clove note
Leave out the ground cloves if you prefer a softer, less pungent spice flavor. Cinnamon and ginger still give the filling warmth, though the pie will taste less like the classic, deeply spiced version.
A less-salty butter crust
Use the same quantity of cold unsalted butter in place of salted butter. The pastry will have a quieter saltiness, but it will still turn flaky; keep the salt in the filling as listed so its seasoning stays balanced.
Storage and Reheating
- Refrigerator: Keep the covered pie refrigerated for up to 4 days. The crust softens a little as it sits, but the custard stays tender.
- Freezer: Freeze the fully chilled pie, whole or in slices, wrapped tightly and placed in an airtight container for up to 1 month for best texture. Thaw it in the refrigerator; the filling may be slightly softer after thawing.
- Reheating: This pie is best served chilled, so you don’t need to reheat it. Avoid microwaving a whole pie, which warms the custard unevenly and softens the crust.
Questions That Come Up While Baking Pumpkin Pie
Classic Pumpkin Pie with Flaky Homemade Pie Crust
Ingredients
Equipment
Method
- Whisk the flour in a medium bowl.
- Cut in the cold butter with a pastry blender or fork until the mixture has pea-size pieces.
- Drizzle in 3 tablespoons ice water and toss with a fork.
- Add more water 1 teaspoon at a time, as needed, until the dough holds together when squeezed.
- Gather the dough into a disk, wrap it, and refrigerate for 1 hour.
- Roll the dough between two sheets of parchment into a 12-inch round.
- Fit the dough into a 9-inch pie plate, fold the overhang under, and crimp the edge.
- Refrigerate the crust for 20 minutes.
- Heat the oven to 425°F with a rack in the lower third and a rimmed baking sheet on the rack.
- Whisk the sugar, cinnamon, ginger, cloves, and salt in a large bowl.
- Whisk in the eggs, pumpkin, and evaporated milk until smooth.
- Pour the filling into the chilled crust.
- Carefully set the pie plate on the hot baking sheet.
- Bake for 15 minutes.
- Reduce the oven to 350°F.
- Bake for 35 to 45 minutes, loosely covering the crust edge with foil if it browns too quickly; the edges should be set, the center should jiggle slightly, and an instant-read thermometer inserted in the center should read about 175°F.
- Cool the pie on a rack for 2 hours.
- Refrigerate for at least 2 hours before serving.