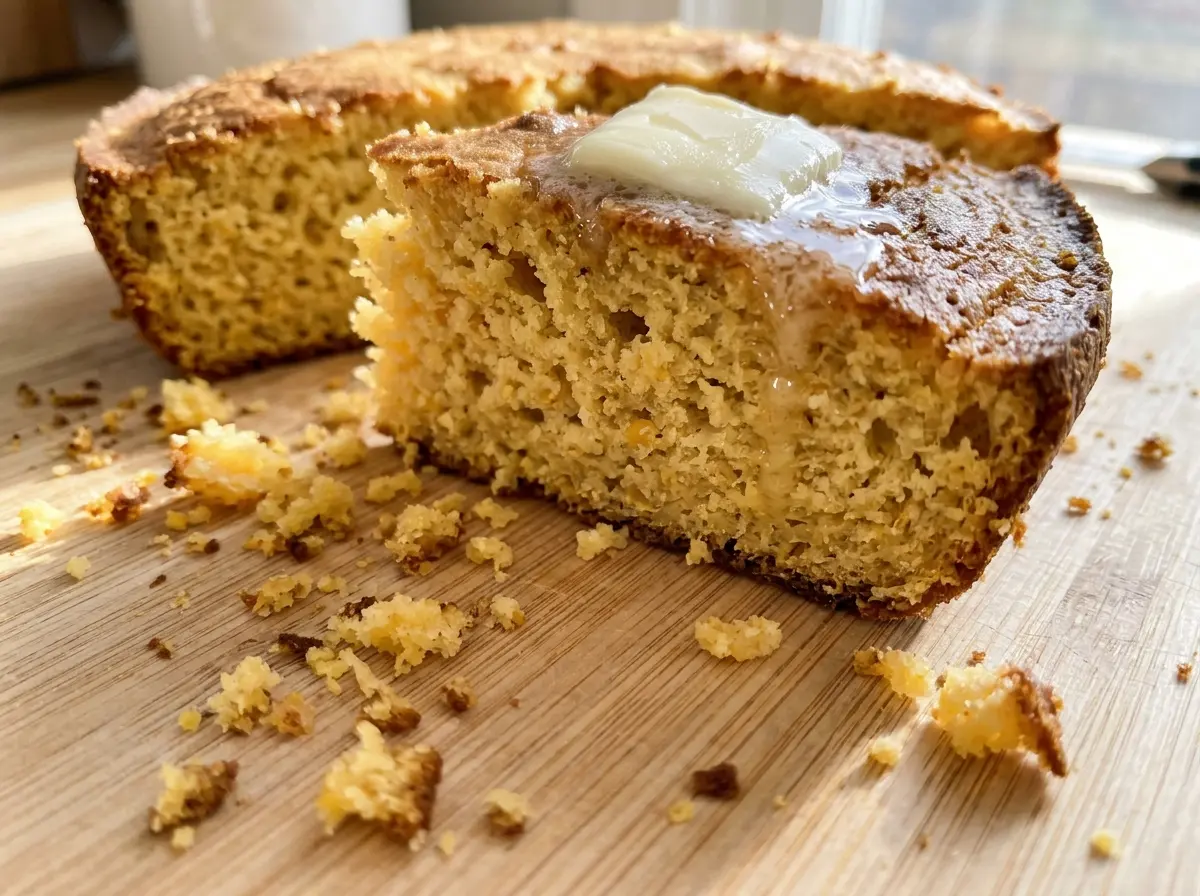
The butter in the skillet is already melting while the oven heats, and that little head start changes the edges of this cornbread. When the batter hits the hot pan, the bottom begins setting right away instead of waiting for the skillet to warm up. I use that method for New Year’s Day Cornbread because it gives each wedge a golden edge and a tender middle without adding extra steps.
The batter comes together quickly, but it rewards a light touch: stir only until the dry ingredients disappear, then get it into the skillet. Buttermilk brings a gentle tang and works with the baking soda, while cornmeal keeps the crumb unmistakably cornbread rather than a plain quick bread. After a short rest in the pan, it cuts neatly into warm wedges with a crisp-edged bottom.
Kitchen Note
Let the melted butter cool slightly before you whisk it into the egg and buttermilk. If it’s piping hot, it can cook the egg before the batter ever reaches the oven.
Save this New Year’s Day Cornbread for its golden skillet edges, tender center, and quick buttermilk batter.
The Hot Skillet Is Doing More Than Keeping the Cornbread From Sticking
A skillet that heats with the oven gives the batter a head start the moment it lands. That matters because cornbread batter is thick enough to sit in place; in a cool pan, the bottom has to warm gradually before it can set. Starting with a hot skillet helps create a browned base while the center rises and bakes through.
The butter in the pan serves two jobs. It coats the bottom so the cornbread releases more easily, and it gives the edges a buttery finish as they bake. Swirl it all the way across the base before adding the batter, then pour promptly so the skillet doesn’t lose its heat while it sits empty. A 10-inch cast-iron skillet gives this batch the thickness the baking time is written for. A much wider pan would spread the batter thinner, while a smaller one would make the center deeper and change how long it takes to bake.
There’s no need to chase a dark, hard crust. Look for a golden top and a center that passes the toothpick check. The edges will continue to settle while the cornbread rests in the skillet, so give it those 10 minutes before cutting.
Why Yellow Cornmeal and Buttermilk Matter in This Skillet

- Yellow cornmeal — This gives the crumb its corn flavor and slightly grainy texture. A standard, finely ground yellow cornmeal blends evenly with the flour; a coarse grind makes a more rustic, noticeably grainier bite. Keep it yellow for the color and flavor this version is built around.
- All-purpose flour — Flour balances the cornmeal and helps the wedges hold together. Measure it without packing it into the cup; too much flour can make the crumb dry and heavy. A different flour blend changes how the batter absorbs liquid, so all-purpose flour is the dependable choice here.
- Buttermilk — Its acidity works with the baking soda, and its thickness gives the batter more body than regular milk. Plain milk doesn’t bring the same tang or acid, so it isn’t a like-for-like swap. Use fresh buttermilk and whisk it smooth with the egg before combining.
- Unsalted butter — Butter flavors both the crumb and the skillet’s browned edge. The skillet portion needs to be in the pan as it heats; the rest goes into the wet mixture. Unsalted butter also lets the measured kosher salt do its job without an unpredictable extra saltiness.
- Egg and leaveners — The large egg helps bind the batter, while baking powder and baking soda give it lift. Check that your baking powder is fresh; stale leavener can leave the cornbread squat even when the batter is mixed gently. The baking soda needs the acidity from the buttermilk, so don’t leave either one out.
From Hot Butter to a Clean Toothpick: Four Checks for the Right Crumb
Heat the skillet while the oven warms
Put 1 tablespoon of the butter in a 10-inch cast-iron skillet, then place the skillet in the oven as you preheat to 425°F. This warms the pan and melts the butter together rather than asking a cold skillet to catch up later. Keep the handle in mind when you take it out; cast iron stays hot. Once the butter has melted, swirl it carefully to coat the bottom.
Whisk the dry ingredients evenly
In a large bowl, whisk the yellow cornmeal, all-purpose flour, sugar, baking powder, baking soda, and kosher salt. Spend a few seconds breaking up any small clumps so the leaveners and salt aren’t concentrated in one spot. The mixture should look even from edge to edge. Whisking here does the blending without needing to work the batter later.
Bring the wet mixture together, then stir lightly
Melt the remaining butter and let it cool slightly. In a medium bowl, whisk the egg and buttermilk, then whisk in the melted butter until the mixture looks smooth. Pour it into the dry ingredients and stir only until combined; a few small lumps are fine, but pockets of dry flour aren’t. If you keep stirring until the batter looks perfectly smooth, the finished crumb can turn tougher.
Bake until golden, then let the crumb settle
Carefully swirl the melted butter in the hot skillet to coat the bottom, pour in the batter, and bake for 20–25 minutes. The top should be golden brown, and a toothpick inserted in the center should come out clean. If the top is already colored but the toothpick still has wet batter, it needs more oven time. Let the cornbread rest in the skillet for 10 minutes before serving so the middle can finish setting and the wedges are easier to lift.
Two Small Changes That Shift the Cornbread Without Losing Its Skillet Character
For a less-sweet, more savory bite
Leave out the granulated sugar if you prefer cornbread with no noticeable sweetness. The corn flavor comes through more plainly, and the top may brown a little less. Keep the rest of the ingredients and method the same so the lift and skillet texture stay familiar.
For a more rustic cornmeal texture
Use a coarser grind of yellow cornmeal in place of the finer grind. The cornbread will have a more pronounced, toothsome grain, rather than the close, tender crumb of finely ground cornmeal. The batter and skillet method stay the same, but the texture will be less delicate.
Storage and Reheating
- Refrigerator: Wrap leftovers or place them in an airtight container and refrigerate for up to 4 days. The crumb firms up when chilled.
- Freezer: Freeze cooled wedges in a sealed freezer-safe container for up to 2 months. Separate layers with parchment so you can take out only what you need.
- Reheating: Warm wedges in a 300°F oven, loosely covered with foil, until heated through. Covering helps keep the cut surfaces from drying; avoid leaving them uncovered in the oven for an extended stretch.
Questions I Get Asked About This Skillet Cornbread
New Year's Day Cornbread
Ingredients
Equipment
Method
- Put 1 tablespoon butter in a 10-inch cast-iron skillet and place it in the oven; preheat the oven to 425°F.
- Whisk the cornmeal, flour, sugar, baking powder, baking soda, and salt in a large bowl.
- Melt the remaining 4 tablespoons butter and let it cool slightly.
- Whisk the egg and buttermilk in a medium bowl, then whisk in the melted butter.
- Pour the buttermilk mixture into the dry ingredients and stir just until combined.
- Carefully swirl the melted butter in the hot skillet to coat the bottom.
- Pour in the batter.
- Bake for 20–25 minutes, until golden brown and a toothpick inserted in the center comes out clean.
- Let the cornbread rest in the skillet for 10 minutes before serving.