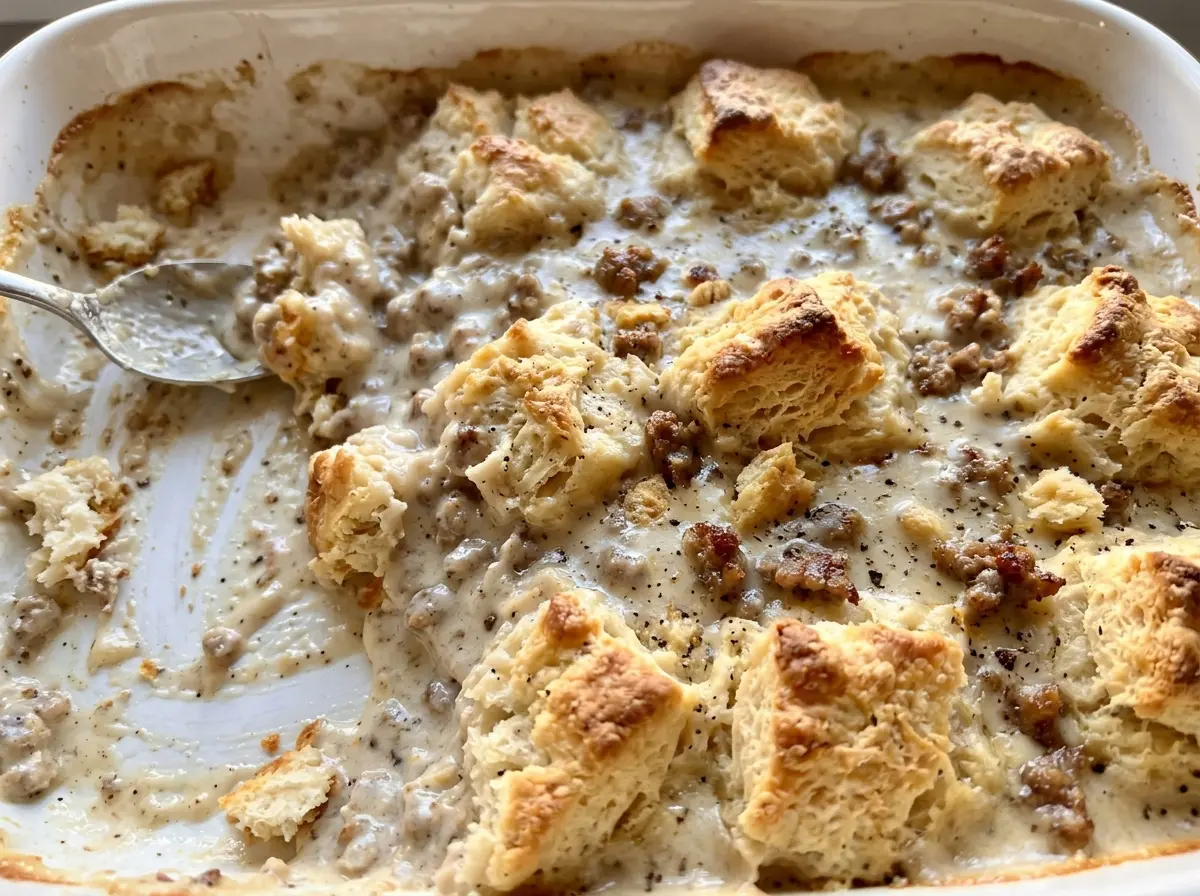
The gravy should cling to a spoon before it ever reaches the baking dish. If it looks like a thin breakfast sauce in the skillet, it can seem even looser once the biscuits sit on top. I let it simmer until it coats the spoon, then pour it into the dish and give the biscuits room to puff. That balance is what makes this sausage gravy and biscuit casserole feel like a proper baked breakfast instead of a bowl of gravy with dough on top.
I build the gravy right in the skillet with the browned pork sausage, butter, flour, and whole milk. Adding the milk gradually makes it easier to whisk the flour smoothly into the pan, and frequent stirring keeps the gravy from catching as it thickens. The refrigerated buttermilk biscuits go on top, where they bake into a golden layer over the creamy sausage gravy. After a short rest, the casserole is ready to serve in generous squares.
Kitchen Note
Give the casserole its full 5-minute rest before serving. The gravy settles around the biscuits, so the first scoop holds together instead of sliding across the plate.
Save this sausage gravy and biscuit casserole for a brunch bake with creamy pork sausage gravy under a golden buttermilk biscuit top.
Why the Gravy Needs to Be Thicker Than a Breakfast Pour
Gravy served over biscuits can be loose enough to run across a plate. In this casserole, it has to sit beneath a biscuit topping while the whole dish bakes. A gravy that still pours like milk won’t give you the same settled layers; it can leave the sausage swimming under the biscuits instead of holding a spoonful together.
Let the flour do its work on the stovetop before you assemble anything. The sausage and flour cook briefly together, then the milk simmers with frequent stirring until the gravy coats a spoon. That texture cue matters more than watching the clock alone, since a skillet’s shape and heat can affect how quickly the liquid reduces. Once the gravy reaches that point, the oven finishes the casserole without asking the biscuits to rescue a thin sauce.
Keep the process in two distinct parts: thicken the gravy in the skillet, then bake it under the biscuits. The biscuits need room to puff, so arrange them evenly rather than pressing them down into the gravy. That keeps the top recognizable as biscuits and gives the casserole a more balanced scoop.
Why Pork Breakfast Sausage, Whole Milk, and Buttermilk Biscuits Matter

- Pork breakfast sausage — It brings both the browned meat and the seasoning that define the gravy. Use sausage sold as breakfast sausage rather than plain ground pork; plain pork won’t have the same seasoning, and the casserole depends on that savory base. The sausage doesn’t need to be fancy, but choose one you like eating on its own.
- Unsalted butter — Butter gives the flour enough fat to form the gravy base and is also used to grease the baking dish. Unsalted butter keeps the seasoning measured by the salt in the gravy. Keep the small portion for the dish separate from the butter added to the skillet.
- All-purpose flour — Flour thickens the milk into a gravy that can support the biscuit topping. Cooking it briefly with the melted butter and sausage helps it blend in before the milk goes into the pan. A different thickener won’t behave exactly the same way here, so all-purpose flour is the dependable choice for this version.
- Whole milk — Whole milk gives the gravy a fuller, creamier body than a thinner milk would. Use fresh milk and add it gradually so it combines smoothly with the flour mixture. For the intended richness and texture, I stick with whole milk rather than replacing it with a plant-based drink.
- Refrigerated buttermilk biscuits — The package gives you eight ready-to-bake biscuits with a consistent size for the top of the casserole. Buttermilk biscuits bring a gentle tang that stands up to the rich gravy. Keep them chilled until assembly so they’re easy to arrange over the hot filling.
Building the Gravy Before the Biscuits Go On
Brown the Sausage in the Skillet
Heat the oven to 375°F and grease a 9×13-inch baking dish with 1 teaspoon of butter. In a 12-inch skillet over medium heat, cook the pork breakfast sausage, breaking it into small pieces as it browns. It should be browned and cooked through to 160°F, which takes 7-9 minutes. Keep the pieces small and fairly even so they distribute through the gravy instead of landing in a few large clumps.
Cook the Flour Before Adding Milk
Add the remaining 2 tablespoons of butter to the sausage and stir until it melts. Stir in the all-purpose flour and cook it for 1 minute, mixing so the flour coats the sausage. Gradually whisk in the whole milk; pouring it in slowly gives you more control as the flour mixture loosens. Stir in the kosher salt and freshly ground black pepper once the milk is incorporated.
Simmer Until the Gravy Coats a Spoon
Bring the mixture to a simmer and stir often as it thickens, about 5-7 minutes. The gravy should cling to a spoon rather than running straight off it. Keep the skillet moving with your spoon, especially along the bottom, so the thickening flour doesn’t settle and catch. Once it reaches that consistency, pour the gravy into the prepared baking dish.
Top Evenly and Bake Until the Biscuits Cook Through
Arrange the eight biscuits evenly over the gravy without pushing them down into it. Bake for 30-35 minutes, until the biscuits are puffed, golden, and cooked through. The tops should look browned rather than pale, but color alone isn’t enough if a biscuit in the center still feels doughy. Let the casserole rest for 5 minutes before serving.
Two Practical Ways to Change the Biscuit-and-Gravy Casserole
Bring in a Little Heat with Hot Pork Breakfast Sausage
Use hot pork breakfast sausage in place of the regular pork breakfast sausage, keeping the same amount and following the same browning and gravy steps. The peppery sausage gives the creamy filling a warmer finish without adding another seasoning. If you’re serving people who prefer a milder breakfast, stick with the standard sausage.
Cut the Biscuits for More Golden Edges
For smaller, more shareable pieces, cut each refrigerated biscuit into quarters and scatter the pieces evenly over the gravy. You’ll get more browned biscuit edges and less of the look of eight separate biscuits. The smaller pieces may finish at a different pace, so use puffing, golden color, and cooked-through centers as your cues.
Storage and Reheating
- Refrigerator: Refrigerate leftovers within 2 hours and keep them covered for 3-4 days. The biscuit topping softens as it sits against the gravy.
- Freezer: Freeze portions in airtight containers for up to 2-3 months. The gravy freezes well, though the biscuit topping will be softer after thawing.
- Reheating: Reheat covered in a 350°F oven until the center reaches 165°F; uncover for the last few minutes if you’d like to crisp the top. Microwaving works for a quick serving, but it softens the biscuits further.
Questions That Come Up When Baking Sausage Gravy and Biscuits
Sausage Gravy and Biscuit Casserole
Ingredients
Equipment
Method
- Preheat the oven to 375°F.
- Grease a 9x13-inch baking dish with 1 teaspoon of the butter.
- Cook the sausage in a 12-inch skillet over medium heat, breaking it into small pieces, until browned and cooked through to 160°F, 7-9 minutes.
- Add the remaining 2 tablespoons butter and stir until melted.
- Stir in the flour and cook for 1 minute.
- Gradually whisk in the milk.
- Stir in the salt and pepper.
- Simmer, stirring often, until the gravy thickens enough to coat a spoon, 5-7 minutes.
- Pour the gravy into the prepared baking dish.
- Arrange the biscuits evenly on top.
- Bake until the biscuits are puffed and golden and cooked through, 30-35 minutes.
- Rest for 5 minutes before serving.