
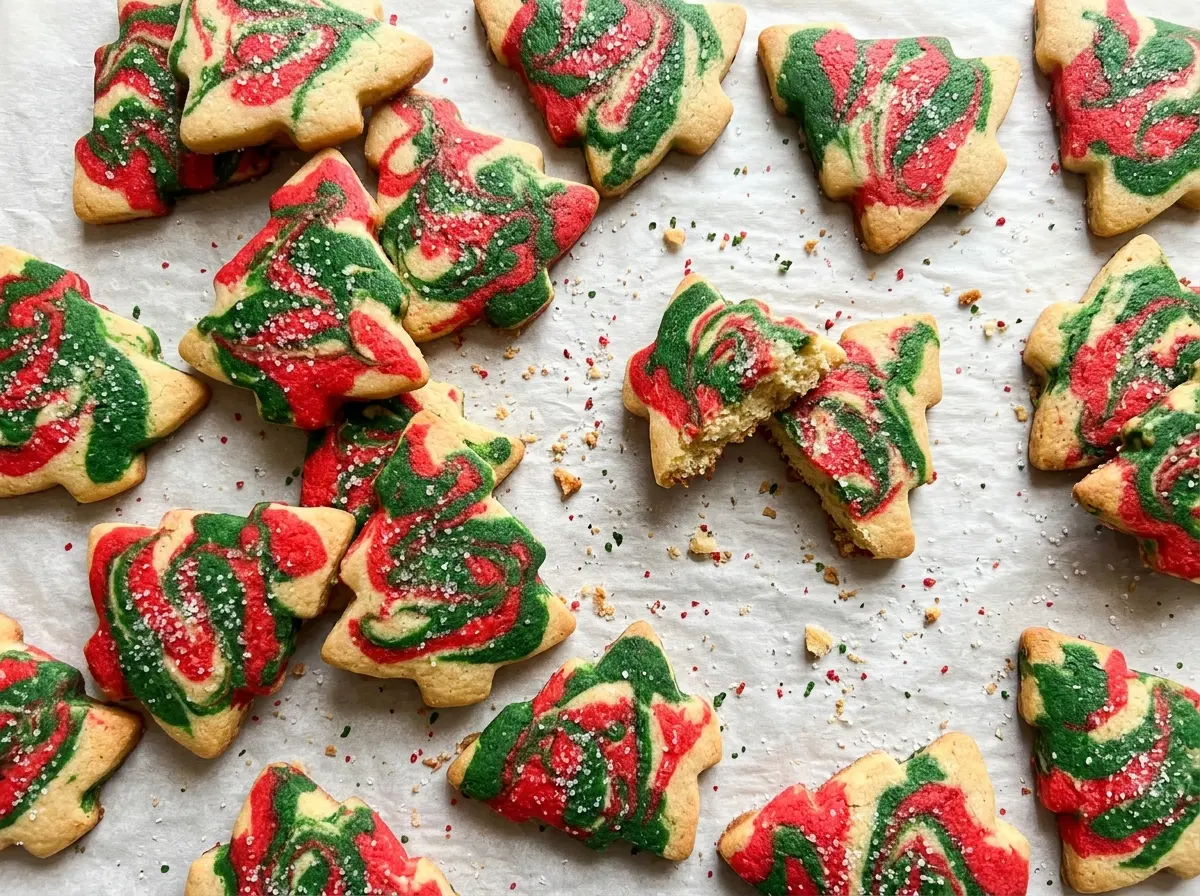
The cut edges of a sugar-cookie tree tell you more than the center does: once they’re just starting to turn golden, it’s time to pull the pan. They’ll finish setting as they rest, leaving you with a tender cookie that still has a clean outline for dipping. These Marbled Christmas Tree Sugar Cookies bring that familiar buttery vanilla flavor together with a white-and-green icing swirl that looks special without requiring piping skills.
I roll the dough between parchment so it stays easy to handle without working extra flour into it. The icing gets its marbled look from a quick swirl in a shallow bowl, then the cookies are dipped right on top. Each one comes out with a slightly different pattern, and the finished trees have a smooth, glossy coating that dries firm.
Kitchen Note
I stop after one or two passes with the toothpick. More swirling blends the green and white into one color instead of leaving those clear ribbons across the cookies.
Save these Marbled Christmas Tree Sugar Cookies for a batch of buttery cutouts finished with crisp green-and-white icing swirls.
Why Chilling the Dough Keeps the Tree Tips Intact
Cutout cookies need dough that can hold a sharp edge while you lift each shape onto the baking sheet. Soft butter makes the dough pleasant to mix, but it also makes the finished dough pliable; chilling the two wrapped disks for an hour firms the butter back up. That means the narrow tips and branches of a tree are less likely to bend or lose their definition before baking.
Rolling between parchment helps in a different way. You can flatten the dough without dusting the counter and rolling pin with extra flour, which can make sugar cookies dry or tough. The paper also gives you a steady surface for cutting the shapes. If one disk warms while you work on the other, keep the second one chilled so both batches are equally easy to cut and handle.
The dough should be soft enough to roll but not sticky or greasy. If it feels loose as you work, pause and let it firm up in the refrigerator rather than forcing the cutter through it. Cleanly cut shapes give the icing a neater outline to follow.
What Gives the Cookies Their Tender Bite and Firm Marble Icing

- All-purpose flour — It gives the cutouts enough structure to keep their shape while staying tender. Use ordinary all-purpose flour rather than self-rising flour, which would change the balance of leavening and salt.
- Unsalted butter — Softened butter creams smoothly with the sugar and brings the cookies’ rich, simple flavor. A standard grocery-store butter works well here; unsalted lets the fine salt stay in control. The butter should yield to a finger but not look oily or melted.
- Granulated sugar, egg, and vanilla — Sugar helps the butter become light during creaming, while the egg binds the dough and keeps the baked cookies from crumbling. Vanilla gives the buttery base its familiar aroma; use a pure extract if you have it, though imitation vanilla works in this straightforward cookie.
- Confectioners’ sugar and meringue powder — Confectioners’ sugar makes a smooth icing, and meringue powder gives it the body to coat a cookie and dry firm. Meringue powder is worth using here; regular granulated sugar won’t dissolve into the same smooth finish.
- Water and green gel coloring — Water lets you adjust the icing’s flow gradually, while gel color gives a vivid green without adding much liquid. Liquid food coloring can thin the icing, so gel is the better choice for keeping the dipping consistency steady.
From Soft Dough to Cleanly Dipped Christmas Trees
Cream the Butter Before Adding the Flour
Whisk the flour, baking powder, and salt together in a medium bowl. In a separate large bowl, beat the softened butter and sugar with a hand mixer on medium until light and fluffy, about 2 minutes. Beat in the egg and vanilla, scraping down the bowl so no butter is left unmixed at the bottom. Add the flour mixture on low and stop as soon as a soft dough forms; prolonged mixing after the flour goes in can make the cookies firm.
Chill, Roll, and Cut the Trees
Divide the dough into two disks, wrap them, and chill for 1 hour. Heat the oven to 350°F and line two baking sheets with parchment. Roll each disk between sheets of parchment to 1/4-inch thickness, then cut 3-inch tree shapes and arrange them about 1 inch apart. Keep the thickness even from center to edge so the narrow tips and wider branches bake at the same pace.
Bake Until the Edges Just Turn Golden
Bake for 9 to 11 minutes, rotating the sheets halfway through. Look for cookies that are set, with edges just beginning to turn golden; don’t wait for the whole surface to brown. The centers may still look pale when the edges are ready. Cool the cookies on their baking sheets for 5 minutes, then move them to a wire rack to cool completely.
Mix the Icing to a Slow-Falling Ribbon
Beat the confectioners’ sugar, meringue powder, and 4 tablespoons of water on low until combined, then beat on medium for 2 minutes until smooth. Add more water a teaspoon at a time, up to 1 tablespoon, until a ribbon of icing disappears back into the surface in about 10 seconds. Divide the icing among three small bowls and leave one white. Stir 1/8 teaspoon of green gel coloring into each of the other two bowls.
Dip the Tops and Let the Icing Set
Spoon a few stripes of white and green icing into a shallow bowl, then swirl them once or twice with a toothpick. Dip the top of each completely cooled cookie into the icing and let the excess drip back into the bowl. Set each cookie on a wire rack while the coating dries, about 2 hours. Add fresh spoonfuls from the separate bowls as needed so the colors in the dipping bowl stay distinct.
Easy Ways to Adapt the Cookies for Your Cutter or Diet
Use a Cup-for-Cup Gluten-Free Flour Blend
Replace the all-purpose flour with the same amount of a cup-for-cup gluten-free baking blend that contains xanthan gum. The cookies may have a slightly more delicate or sandy texture, so handle the cutouts gently and let them cool fully on the baking sheet before moving them.
Turn the Same Dough into Stars
A star cutter makes a simple alternative when you don’t have a tree cutter. Choose a shape close to the same 3-inch size so the cookies bake in a similar window; the icing still gives each shape the same white-and-green marbled finish.
Storage and Reheating
- Refrigerator: These don’t need refrigeration. Store the fully dried cookies at room temperature; a cold, humid container can make the icing tacky as the cookies warm.
- Freezer: Freeze completely cooled, undecorated cookies in an airtight container with parchment between layers for up to 2 months. Thaw them while still covered, then dip and decorate.
- Reheating: No reheating is needed. Serve at room temperature; warming decorated cookies can soften or melt the icing.
Questions That Come Up While Making These Tree Cookies
Marbled Christmas Tree Sugar Cookies
Ingredients
Equipment
Method
- Whisk the flour, baking powder, and salt together in a medium bowl.
- In a large bowl, beat the butter and sugar with a hand mixer on medium speed until light and fluffy, about 2 minutes.
- Beat in the egg and vanilla until combined, scraping down the bowl as needed.
- Mix in the flour mixture on low speed just until a soft dough forms.
- Divide the dough into two disks, wrap, and chill for 1 hour.
- Heat the oven to 350°F.
- Line two baking sheets with parchment paper.
- Roll each dough disk between sheets of parchment to 1/4-inch thickness.
- Cut out 3-inch tree shapes and arrange them about 1 inch apart on the sheets.
- Bake for 9 to 11 minutes, rotating the sheets halfway through, until the cookies are set and their edges are just beginning to turn golden.
- Cool the cookies on the baking sheets for 5 minutes.
- Transfer the cookies to a wire rack and cool completely.
- Beat the confectioners' sugar, meringue powder, and 4 tablespoons water in a medium bowl on low speed until combined.
- Beat on medium speed for 2 minutes until smooth.
- Add more water 1 teaspoon at a time, up to 1 tablespoon, until a ribbon of icing disappears back into the surface in about 10 seconds.
- Divide the icing among three small bowls.
- Leave one bowl white.
- Stir 1/8 teaspoon green gel coloring into each of the other two bowls.
- Spoon a few stripes of white and green icing into a shallow bowl and swirl them once or twice with a toothpick.
- Replenish with spoonfuls from the bowls as needed to keep the colors distinct.
- Dip the top of each cooled cookie into the marbled icing and let excess drip back into the bowl.
- Set the cookies on a wire rack until the icing is dry, about 2 hours.


